
Today, we are going to discuss how to extract text from image. We will be using C# and the .NET framework. The project type will be WPF.
How to Extract Text from Image – Source Code
This is just the first part of a series of tutorials that will lead us to create something quite interesting. At this time I will not reveal the final application, but I guess, as we publish more posts, the idea will become apparent.
Extract Text from Image
Extracting text from image is known as OCR. The OCR abbreviation stands for: Optical Character Recognition. It is a process that transforms image into text. This technology is wildly used to store digital documents such as images, into text (searchable format).
Today we will write such application. And by the end of this tutorial spree we will also see it’s potential and how to use it properly.
What are we going to build?
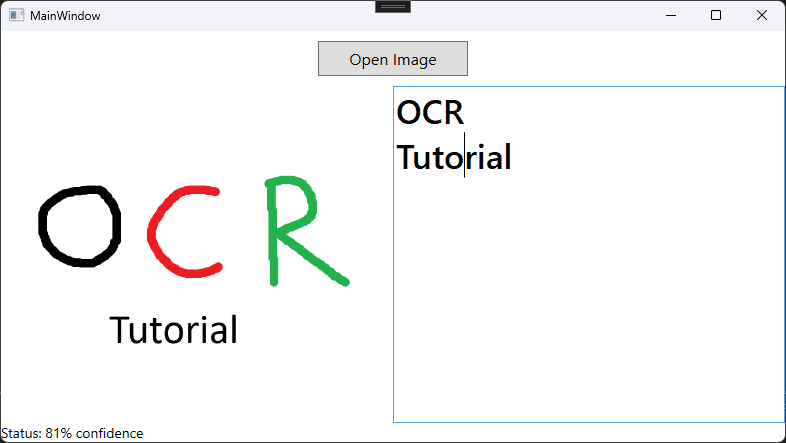
It’s a simple WPF application with OCR capabilities. We are going to create a button, which will allow us to select image from our PC. Then, we are going to show the image on the left side, while the OCR-ed text will be displayed on the right side. At the bottom we will display the status of the operation. Quite simple, so without further do, let’s get on with it.
Set up the project
For this tutorial we will be using a third party library called Tesseract. This is an old library written in C++ that has a C# wrapper for us. Here is a link from the git repository:
https://github.com/charlesw/tesseract
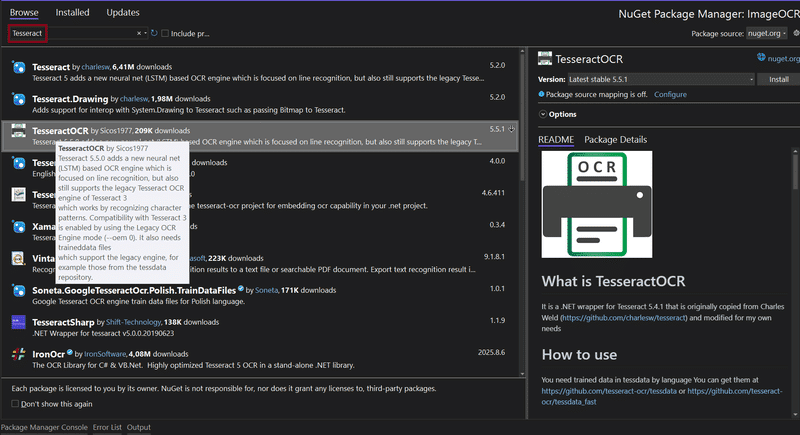
This is a .NET wrapper for tesseract-ocr library. In order to use it we must open the Nuget Package Manager and search it under the name: Tesseract, like so:
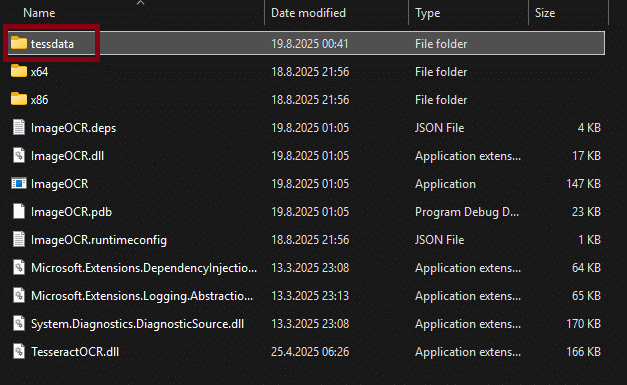
To use Tesseract you must obtain the train data as well. Please download the zipped file from the following url:
https://github.com/tesseract-ocr/tessdata
The zipped file is quite big, I think around 600MB, so be patient when downloading. It just takes time. Once you obtain the zip file you must extract it in the exe file location.
Now you are good to go. Tesseract is set up and ready to be used.
More on DevInDeep:
- How to Create Toggle Button in WPF
- How to Implement Tree Data Structure in C#
- How to Filter TreeView Control in WPF
Design the Main Window
The image above shows how the main window will look like. The WPF XAML code bellow shows you how to achieve it.
<Grid>
    <Grid.RowDefinitions>
        <RowDefinition Height="auto" />
        <RowDefinition Height="*" />
        <RowDefinition Height="auto" />
    </Grid.RowDefinitions>
    <Button
        Grid.Row="0"
        Width="150"
        Height="35"
        Margin="10"
        Click="OpenImage"
        Content="Open Image"
        FontFamily="Segoe UI"
        FontSize="16" />
    <Grid Grid.Row="1">
        <Grid.ColumnDefinitions>
            <ColumnDefinition Width="*" />
            <ColumnDefinition Width="*" />
        </Grid.ColumnDefinitions>
        <Controls:CustomImage
            x:Name="image"
            Grid.Column="0"
            ImageLoaded="ImageLoaded" />
        <Controls:OCRControl x:Name="ocr" Grid.Column="1" />
    </Grid>
    <TextBlock
        Grid.Row="2"
        FontFamily="Segoe UI"
        FontSize="14"
        Text="{Binding ElementName=ocr, Path=Status}" />
</Grid>
If you were to copy and paste this code into your project. You will notice there are two controls missing. The first one being CustomImage and the second one OCRControl. Both of these XAML elements represent custom user controls we are about to build.
I constantly create and use such elements because it makes my life a whole lot easier. Both controls have custom properties and behaviour that I intend to use. By implementing them myself I could achieve a more fluent and readable code. So, let’s see it.
Main Window C# Implementation
public MainWindow() => InitializeComponent();
private void OpenImage(object sender, RoutedEventArgs e) =>
    new OpenFileDialog()
    .ShowImageDialog()
    .Do(StartProcess);

private void StartProcess(ImageFilePath imageFilePath) => image.FilePath = ocr.FilePath = imageFilePath;
private void ImageLoaded(object sender, EventArgs e) => ocr.OcrImage();
This C# code is quite easy to understand. When you click on the button it fires the OpenImage event. This event calls upon OpenFileDialog class and it calls the ShowImageDialog extension method. This method returns an Optional type with the ImageFilePath if the user has selected a file.
As you can see, if a file is present then the StartProcess method is called. This function sets the FilePath property on the image and ocr controls respectively. And once the image is loaded and displayed in the image control, then the ImageLoaded event is fired and it starts the OCR process.
This is quite high level and we will dig deeper. But, as you can see I drive the development process by creating my own types and methods.
The Common namespace
This WPF project consists of a Common namespace. Inside you will find three folders:
- Controls
- Extensions
- Types
First we will look at the Extensions folder. Inside there is a file called OpenFileDialogExtensions.cs
Because the OpenFileDialog class in .NET is very broad (and I want to select only images), I extended it with one more method. Here is the C# implementation:
internal static Optional<ImageFilePath> ShowImageDialog(this OpenFileDialog dialog)
{
    dialog.Filter = "Image Files|*.jpg;*.jpeg;*.png;";
    dialog.Multiselect = false;
    if (dialog.ShowDialog().Value)
        return ImageFilePath.TryCreate(dialog.FileName);
    return Optional<ImageFilePath>.Empty();
}
In order to extract text from image, we first must select a valid one. This method does just that. It makes sure only file types allowed by the OCR engine are allowed.
Once we have the file path we wrap it with our own type called ImageFileType. It is exactly what you think, and here is the code:
internal class ImageFilePath
{
    private readonly FileInfo fileInfo;
    public Uri Value => new Uri(fileInfo.FullName);
    public ImageFilePath(FileInfo fileInfo) => this.fileInfo = fileInfo;
    internal static Optional<ImageFilePath> TryCreate(string value)
    {
        try
        {
            FileInfo fi = new FileInfo(value);
            if (fi.Exists)
                return Optional<ImageFilePath>.Create(new ImageFilePath(fi));
            return Optional<ImageFilePath>.Empty();
        }
        catch { return Optional<ImageFilePath>.Empty(); }
    }
}
This is a data type, that keeps the information about the selected image file.
There is one more type we need to discuss. And that is the generic implementation of Optional. I am not going to discuss or show the code here, since we have used it numerous times. If you are interested, you can open the following tutorial: How to Implement Undo Feature on TextBox. Under the C# Common Classes section you will find the C# implementation.
Custom WPF User Controls
Now its time to revisit the topic of custom user controls.
Custom Image
Now, don’t get me wrong. You can use the regular Image control that the .NET framework offers. There is nothing wrong with that. But, I wanted to implement something extra, and I did not want to clog the main code. So, my solution was to create this CustomImage control.
internal class CustomImage : Image
{
    public event EventHandler? ImageLoaded;
    private void InvokeImageLoaded()=>ImageLoaded?.Invoke(this, EventArgs.Empty);

    public static readonly DependencyProperty FilePathProperty =
    DependencyProperty.Register(
        name: "FilePath",
        propertyType: typeof(ImageFilePath),
        ownerType: typeof(CustomImage),
        typeMetadata: new FrameworkPropertyMetadata(defaultValue: null, FilePathPropertyChanged));
    public ImageFilePath FilePath
    {
        get => (ImageFilePath)GetValue(FilePathProperty);
        set => SetValue(FilePathProperty, value);
    }

    private static void FilePathPropertyChanged(
    DependencyObject sender, DependencyPropertyChangedEventArgs e)
    {
        CustomImage? customImage = sender as CustomImage;
        if (customImage != null)
        {
            customImage.Source = new BitmapImage(((ImageFilePath)e.NewValue).Value);
            customImage.InvokeImageLoaded();
        }
    }
}
The most important thing to note, is that this control has a dependency property called FilePath. This allows me to load the image directly from a PC location. Once the path is set, the Image property is set and the ImageLoaded event is invoked.
I like this solution because the control allows me to set the image first and then call the OCR process. Basically the next step is to extract text from image. As a result, let’s move on to OCRControl.
Extract Text From Image: OCRControl
When we OCR a document we get a string back. Usually we would like to display this string somewhere. Well, this somewhere is right here. This controls is responsible for processing the image, gathering the OCR results and display the text inside a TextBox.
The XAML code is very straightforward
<Grid>
    <TextBox
        x:Name="ocrText"
        FontFamily="Segoe UI"
        FontSize="34"
        FontWeight="DemiBold"
        HorizontalScrollBarVisibility="Auto"
        VerticalScrollBarVisibility="Auto" />
</Grid>
It’s just a Grid element with a TextBox inside of it. Now, let’s look at the back end implementation code.
public partial class OCRControl : UserControl
{
    private readonly Engine engine = new Engine(@"./tessdata", TesseractOCR.Enums.Language.English, EngineMode.Default);
    private Optional<ImageFilePath> maybeImageFilePath = Optional<ImageFilePath>.Empty();
    public OCRControl() => InitializeComponent();
    internal void OcrImage() => maybeImageFilePath.Do(ocr);
    private void ocr(ImageFilePath imageFilePath)
    {
        try
        {
            using var img = TesseractOCR.Pix.Image.LoadFromFile(imageFilePath.Value.AbsolutePath);
            using var page = engine.Process(img);
            ocrText.Text = page.Text;
            Status = $"Status: {page.MeanConfidence * 100}% confidence";
        }
        catch (Exception ex)
        {
            ocrText.Text = string.Empty;
            Status = $"Status: Failed to OCR Image. Error: {ex.Message}";
        }
    }
}
We declare and initialize the OCR engine with the data. We set the language to English and declare a variable to hold the image file path. Inside there is one important method: OcrImage. If an image is present than the ocr method will be executed.
In case the user provides unsupported image format we wrap the image loading logic with a try/catch block. Then, once the image is loaded we call the Process method on the engine instance. This will return a page instance which will contain the ocr text and the confidence parameter.
Of course we set up the text to be displayed inside the TextBox control and set the Status property of the control.
Later in a following post we will improve this code. The OCR related logic will be put in a separate class, but for now this is quite OK.
How to Extract Text from Image: Conclusion
Well, we are at the end of this tutorial. This is just part of what is yet to come. The last C# code segment we wrote is the most important one to remember. Later we will refactor it and re-use it in another feature.
This is the most basic tutorial on how to extract text from image in C# and .NET. Although we are using a third party library for this project, we will have tutorials where we will look behind the curtain and see how this process actually works.
Until next time,