

In todays post we will see how to use the ML.NET Model Builder to solve a simple image classification problem.

Cat vs Dog Image Classifier using ML.NET Model Builder Project Files: Download
ML.NET: Model Builder
ML.NET Model Builder provides an easy-to-understand visual interface to build, train and deploy custom machine learning models. In this article we will see how to solve image classification problem in 4 steps. And that is exactly the point. The Model Builder allows the user to solve different machine learning problems without having any prior knowledge. It is a tool that is shipped with Visual Studio 2019, and it serves as a great starting point. It abstracts away the machine learning complexity and allows you to jump start on a project.
Deep Learning with ML.NET is enabling developers to use Machine Learning across a wide variety of domains. All the way from sound, vision, text, NLP, and a lot more. Now you can use deep learning to classify or understand sounds, predict music notes, understand vision, or detect objects.
Image Classification
Image classification is a very popular example of deep learning. Simply put, image classification allows you to classify images into one or more categories. In this example, we are going to classify images into whether the image is of a cat or a dog. So how does ML.NET and Model Builder help us?
Traditionally if you wanted to classify images, you would have to put in a significant amount of time into it. For example, you would have to load the data. Then analyze and preprocess it. Build up a classification model. Train it and evaluate the result. One of the most painful steps is choosing the right hyper parameters to fine tune the model. However, with ML.NET and Model Builder this process is reduced to a minimum.
Having said this, one of the most impressive features of the Model Builder is AutoML. It automatically explores different machine learning algorithms and settings. But it also automatically selects a trainer for us to ensure the highest possible accuracy on the provided data set. This allows the user to find the best model for a given scenario. If that was not enough, the Model Builder also produces the code, you need to load your model and start making predictions.
As a result, we can pick a scenario, load the data, specify how long to train for and go – it is that simple. All the required code will be generated automatically, and the model will be trained and saved locally.
Download and install Model Builder
If you have the latest version or update for Visual Studio you are all set up. But FYI the Model Builder ships with Visual Studio 16.6.1 and later versions when you install one of the .NET workloads. In case you are unable to add Machine Learning to your project then you might want to:
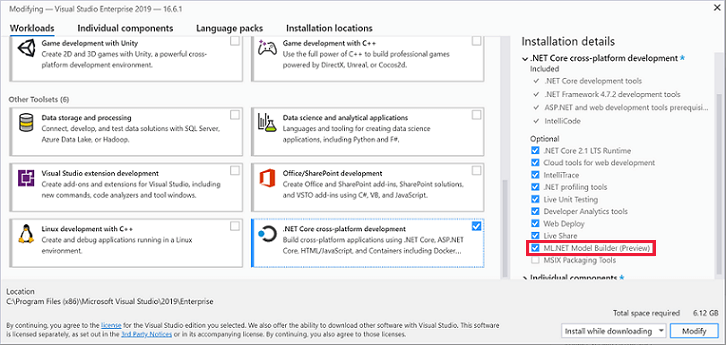
- Open the Visual Studio Installer and Modify the instance of Visual Studio that you would like to use with Model Builder.
- Check the optional ML.NET Model Builder (Preview) component.
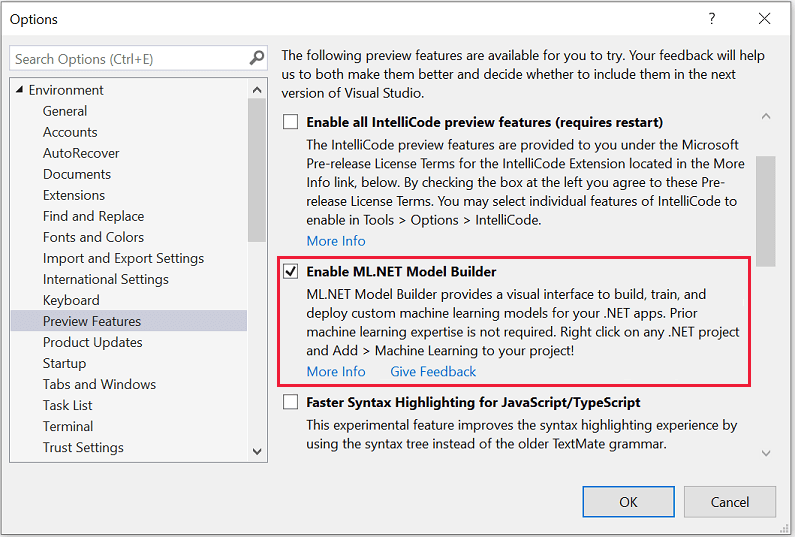
Then you would need to enable the preview feature
- In Visual Studio, go to Tools > Options > Environment > Preview Features.
- Check Enable ML.NET Model Builder.
Preview Model Builder
It is called “Preview Model Builder” because it still is not finished. There are still a lot of issues open on the official GitHub for it. While ML.NET itself has already had several major releases, the Model Builder does not really have all the functionality available in ML.NET yet.
So, if you have not yet updated your Visual Studio or Model Builder tool, please do it now.
Image Classification
Image Classification is the task of assigning an input image one label from a fixed set of categories. This is one of the core problems in Computer Vision that, despite its simplicity, has a large variety or practical applications.
A digital image is composed of pixels. The pixel is a numeric representation of the intensity or gray level of a single point in a picture. Every pixel has a color and all the pixels together are the picture. The color of a pixel can be stored by using a combination of red, green, and blue (RGB format) but other combinations are also possible.
To sum up, an image is a 2D matrix composed of pixels. Each pixel is characterized by its special coordinates and its value (the intensity).
Here are a couple of examples.
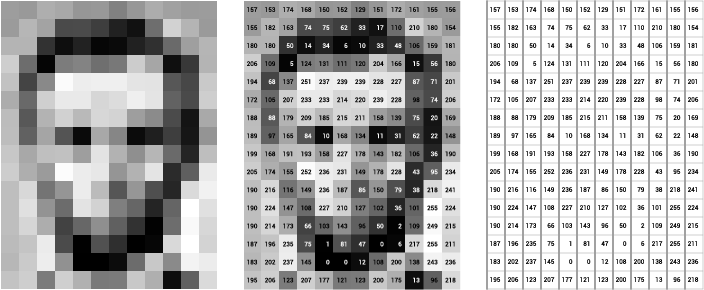
Contextual Image Classification
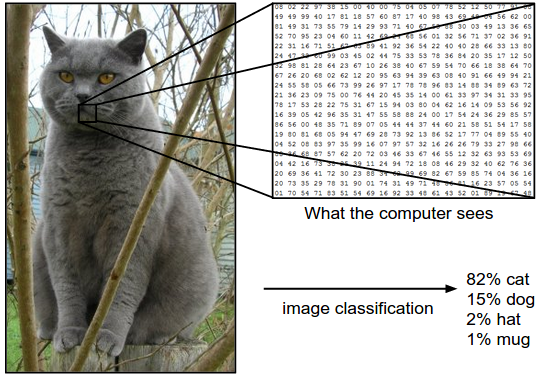
For us humans it is easy to tell what we see on a given image. But that task is not that trivial for computers. As you can see from the image above, a computer sees a matrix filled with numbers. So how does a computer know what that image represents? Keep in mind that the brightness, cat species or the cat position and size may vary. So, there are endless possibilities. How do we write an algorithm, or set of rules to identify cat on an image? We do not. That is simply not possible.
So, what we are going to do is provide the computer with many images of cats, develop a learning algorithm that will look at the image and based on the visual cues, decide if the image contains a cat. And, these cues are features, unique to the cat species. But what does “contextual” means?
Contextual means that we will be focusing on the relationships of the nearby pixels. To build a good visual set of features, that uniquely describes a cat, we cannot rely on one pixel. Instead, we rely of a whole neighborhood of pixels.
This is like language processing. A single word may have multiple meanings unless the context is provided. For images, the principle is same. We need to find out a distinguishable patterns and associate proper meanings to them.
Image Classification and Machine Learning
The word pattern is a key word here. Image classification task is nothing more than a pattern recognition problem. Think about it. If we want to recognize if an image contains a cat, we must look for a cat like features. Although cats defer from one species to another, they still have common visual cues. So, all we have to do is develop a learning algorithm that can learn to detect cat like features.
Image Classification with Model Builder
We are going to start this tutorial by creating the application that will be consuming our ML.NET model.
To kick things off, you can start by opening Visual Studio. Create a .NET Core or .NET Application. I will be using a .NET framework Windows Forms application.
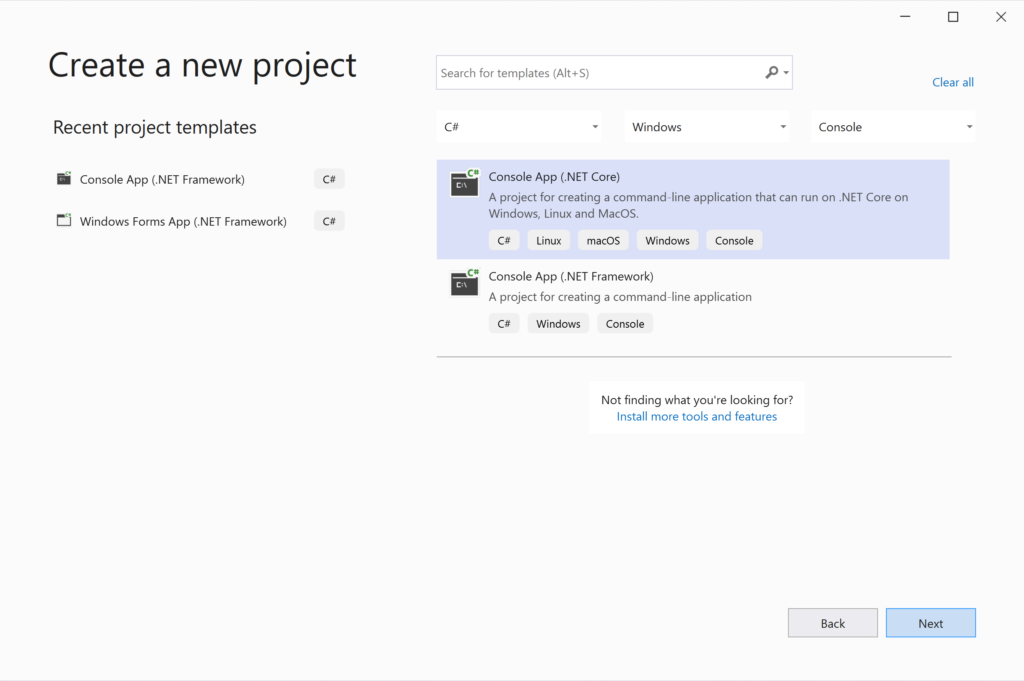
Create a .NET Core console application in Visual Studio
- Open Visual Studio
- Select Create a new project
- Select Console App (.NET Core)
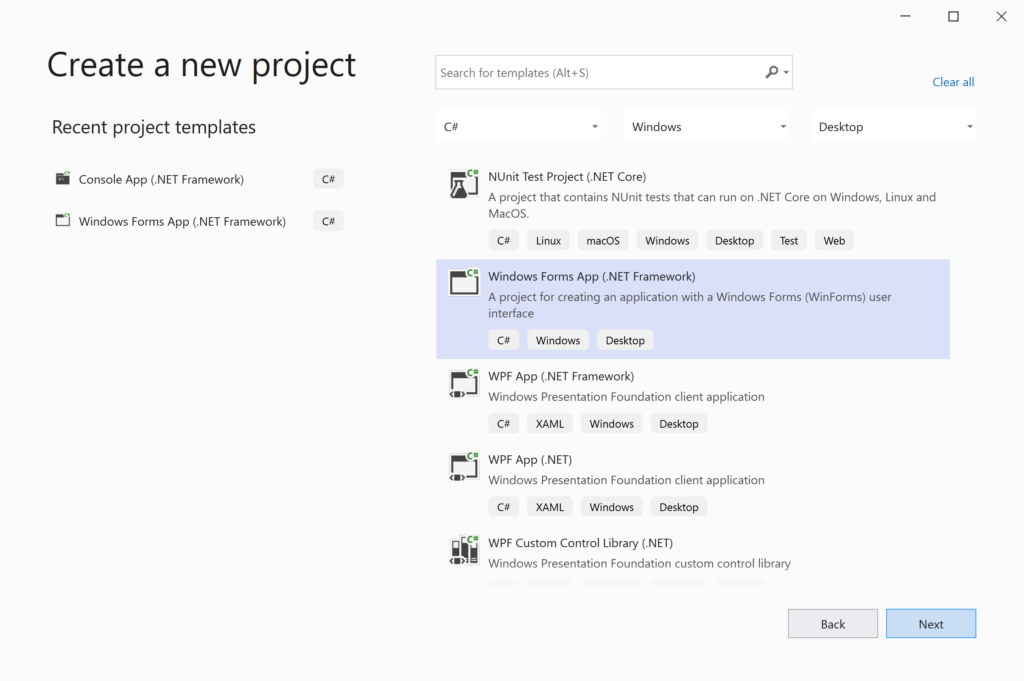
Create a .NET Windows Forms application in Visual Studio
- Open Visual Studio
- Select Create a new project
- Select Windows Forms App (.NET Framework)
On the next window Visual Studio presents, you can select the project location and project name. As project name I chose: CatVsDogClassifier. As the target .NET Framework, I chose .NET Framework 4.7.2. Now create the Visual Studio solution.
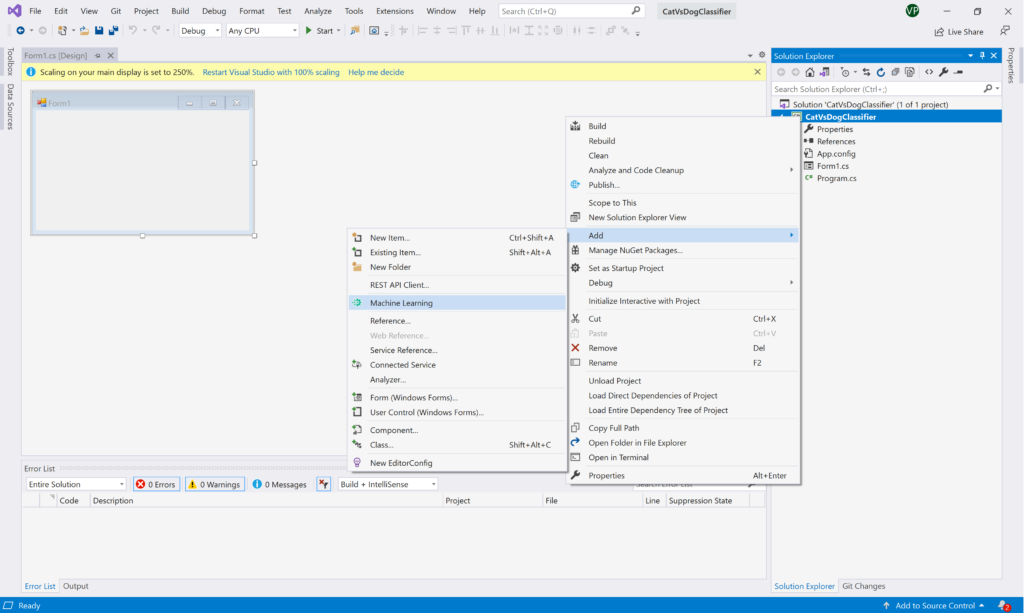
Add Machine Learning to our Visual Studio Solution
Once we have the application created, we can now add Machine Learning to our Visual Studio solution. In Solution Explorer, right click on the newly created application project, and select Add > Machine Learning. This command will launch the Model Builder.
ML.NET Model Builder: Select a Scenario
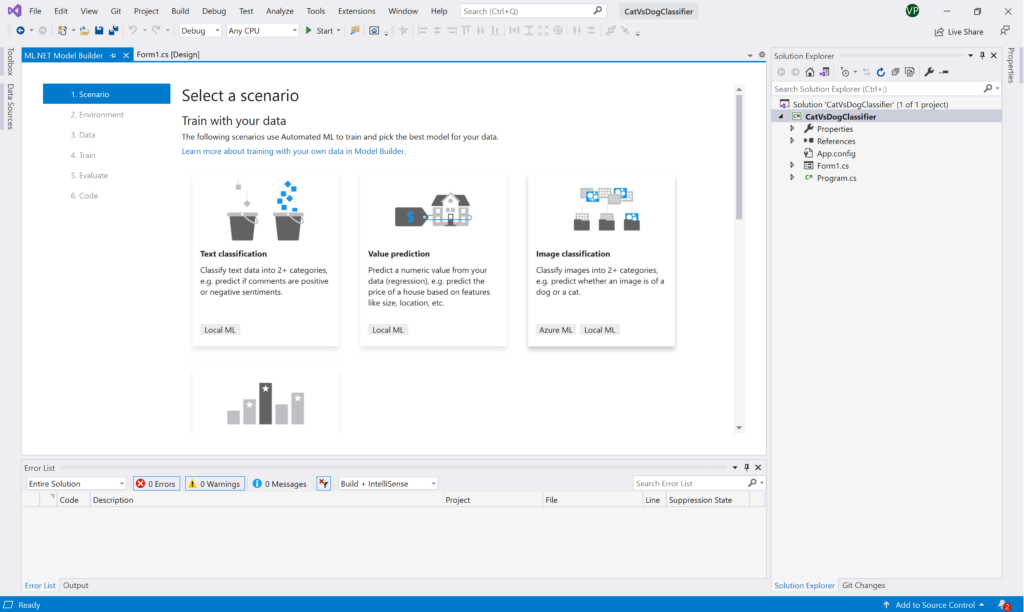
In this window we can see all the possible scenarios that use AutoML. And those are:
- Text Classification
- Value Prediction
- Image Classification
- Recommendation
We will choose Image Classification. We will cover how to use the others in some future post.
ML.NET Model Builder: Training Environment
Before we start training, we need to select our training environment. There are two options, and those are:
- Local
- Azure
Because not everyone has, or can afford an Azure account, we will stick with Local. The Local training environment allows us to train our model on our machine. Before we proceed to the next step, there are several things to consider.
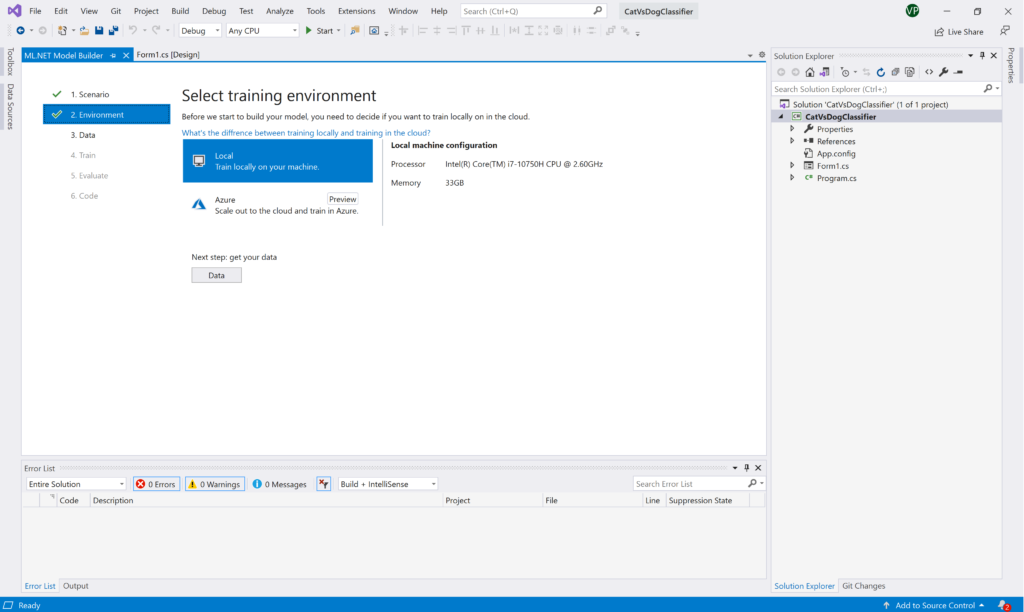
When you train locally on your machine, you work with the constraints of your computer resources. Such as CPU, memory, and disk. The train process may execute quite slow, especially if you use CPU training. For this task local GPU training is possible.
CPU vs GPU
The main difference between CPU and GPU architecture is that a CPU is designed to handle a wide range of tasks quickly, but with a concurrency limitation. A GPU is designed to quickly render high-resolution images and video concurrently.
Because GPUs can perform parallel operations on multiple sets of data, they are also used for tasks such as Machine Learning.
So, let us just pick Local training for now. We will see how to use Azure on another post.
ML.NET Model Builder: Add Data
The way you build a model with Deep Learning is by providing input data. This is your training data which consists of cat and dog images. The images are placed in separate folders, and those folders represent our labels or output data.
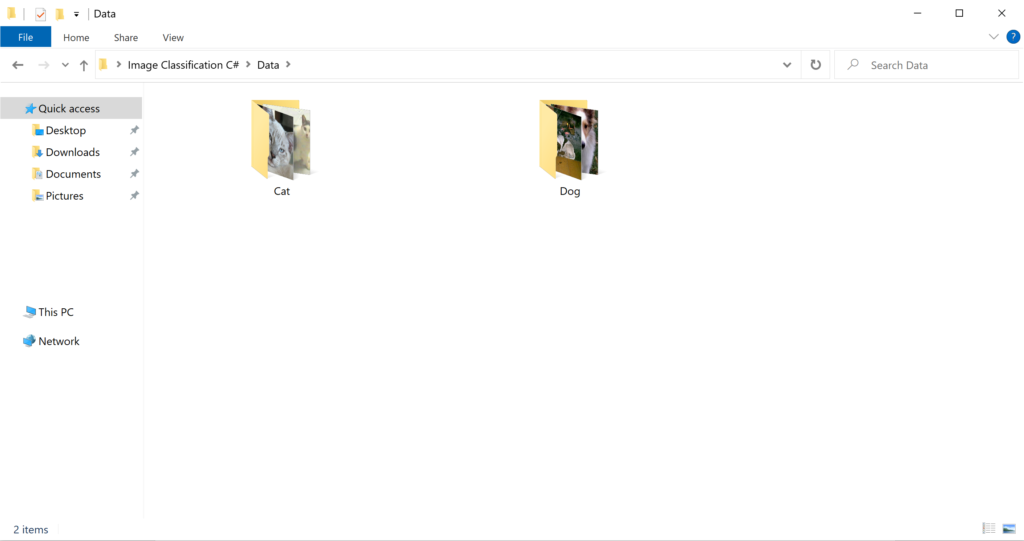
To sum up, the images inside those folders is our input data or training set. The folder names are our Labels or output data. This is a consequence of using Supervised Machine Learning paradigm. This type of machine learning task requires an input and output data points. We will talk more on this soon.
Let us see how we can add our data.
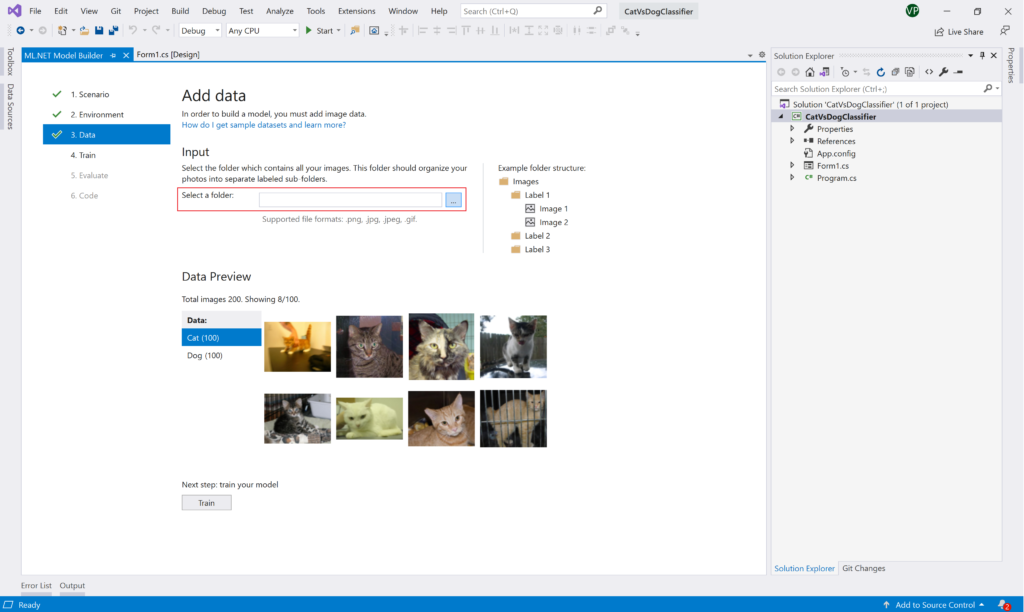
Under the Select a folder option you can paste your root data folder path, or you can use the folder picker on the right. Please note that we must select the parent folder of our Cat and Dog folders.

As you can see, the Model Builder tool will load up the images and preview them. We are ready to train…
ML.NET Model Builder: Training
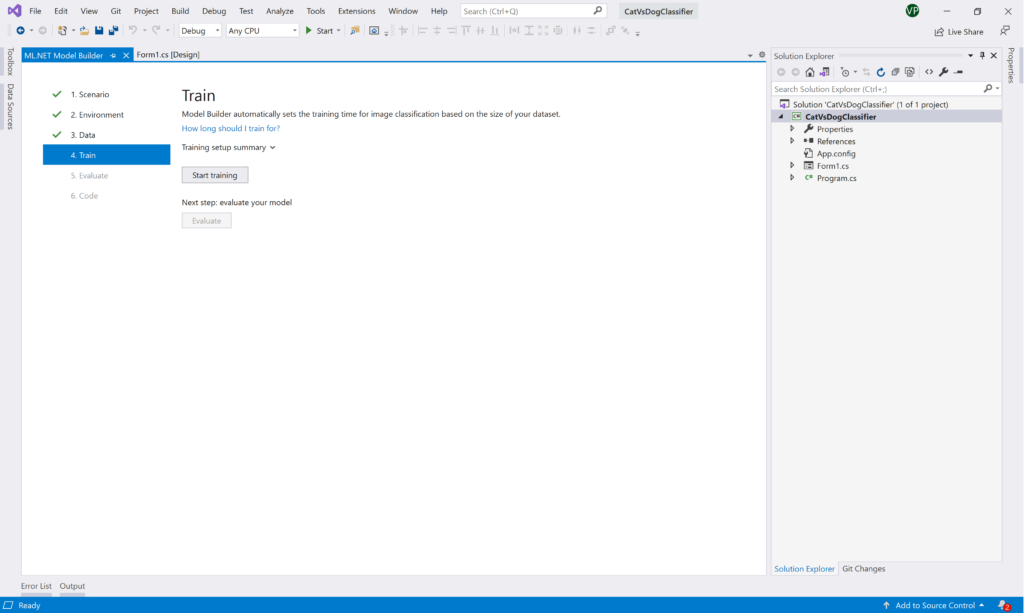
All we have to do to start training is to click the “Start Training” button. Then the ML.NET Model Builder will take over the process.
Transfer Learning
The first thing that the Model Builder will do is download resnet_v2_50_299.meta file. This file is needed because the Image Classification Trainer uses TF.Net to load a pretrained model. TF.Net is just a C# binding to TensorFlow. For now, this is all you have to know. Before continuing let us see what is a pre-trained model and why are we using it?
Transfer Learning is a machine learning method where a model developed for a task is reused as the starting point for a model on a second task. So, what the Model Builder did is download a pre-trained model and load it up for us. This is quite a popular approach in Deep Learning. It allows us to speed up training and improve the performance of our Deep Learning model.
ML.NET: ResNet
ResNet (short for Residual Networks) is a classic neural network used as a backbone for many computer vision tasks. The model allowed us to train extremely deep neural networks successfully. We will talk a lot more about Transfer Learning in the upcoming tutorials. The important thing to remember right now, is that ResNet will help us train faster and improve our ability to differentiate between cats and dogs.
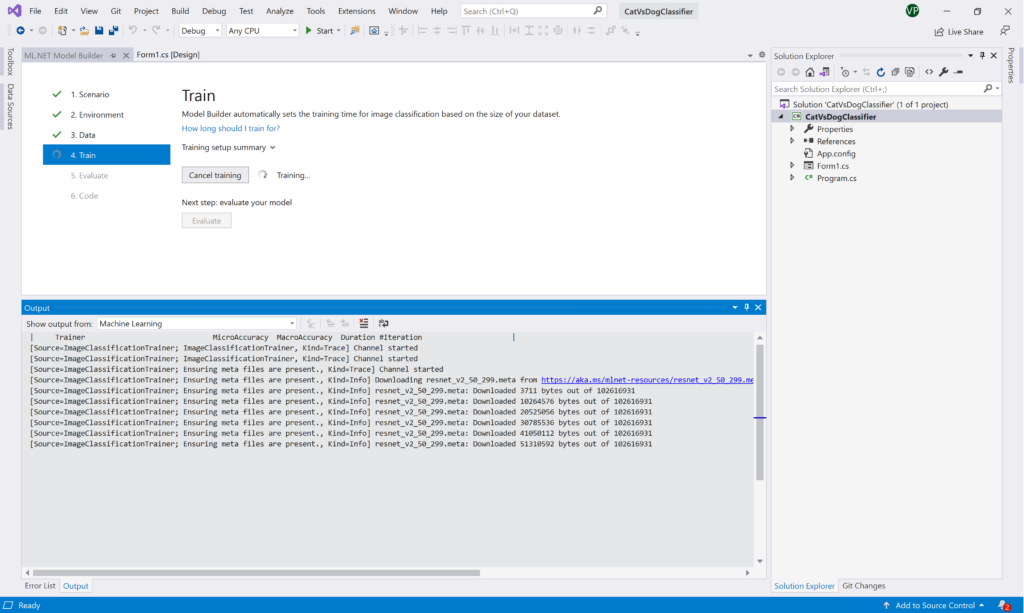
Depending on your internet connection, it might take a while before the model is downloaded.
Once, the model is downloaded the training starts. You can see the following output
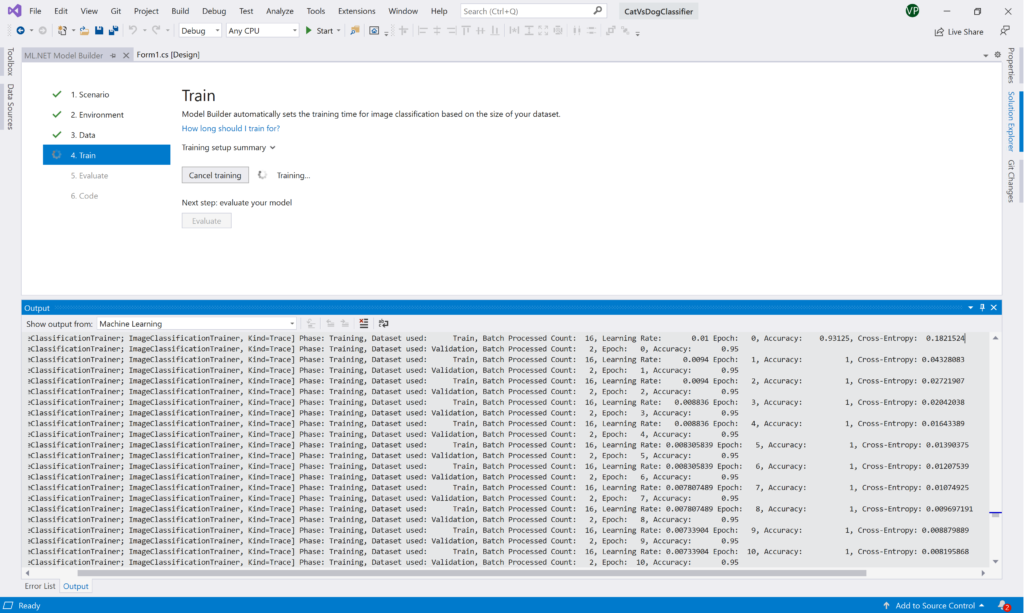
The information printed in the Output window shows us the progress of our training process. Right now the only parameter we are going to be looking at is Accuracy. This generally tells us how good our model performs the classification task on the data set. Depending on your PC it is a good idea to leave it training in the next 10-15 minutes.
ML.NET Model Builder: Evaluate
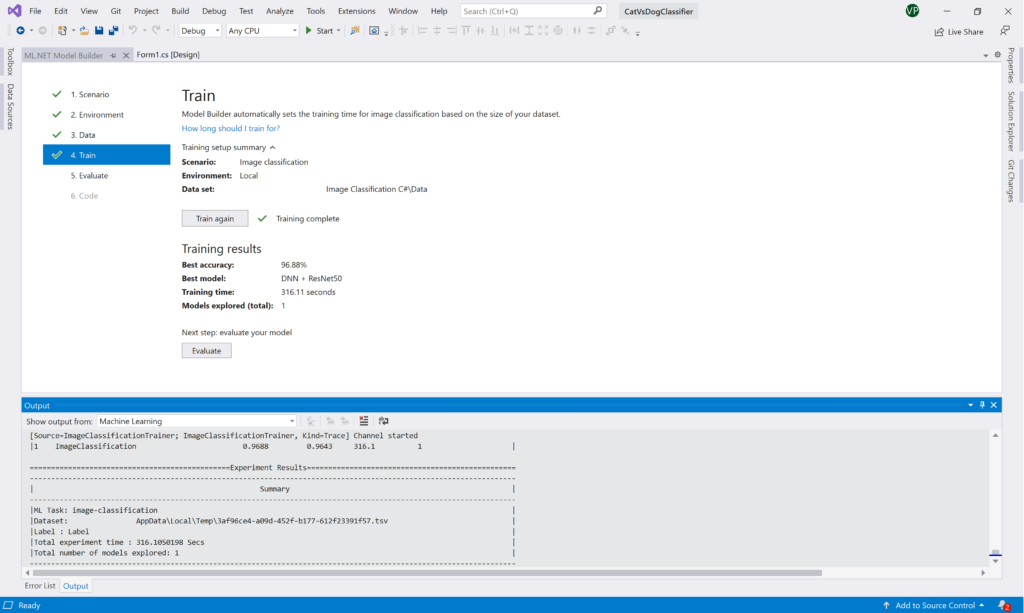
Once the training is done, we can evaluate the results.
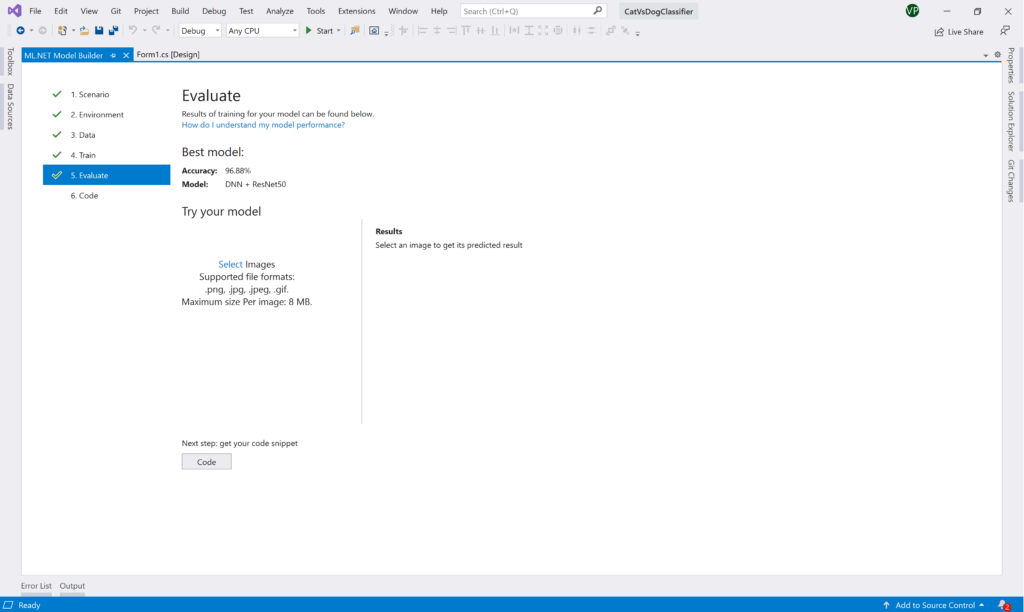
We can see that our best model has an accuracy of 96.88% which is quite good. The Model is “DNN + ResNet50” which just states that we are using Deep Neural Network with the ResNet50 model. On this window the Model Builder allows you to test your model as well. So, let’s see how it performs.
ML.NET Model Builder: Test
If you want to test the model, you can click over the Select hyper link (Select Images) and choose an image. Then the Model Builder will do a Forward Propagation of the image and classify it. The first image I chose was one of a cat, and here are the results:
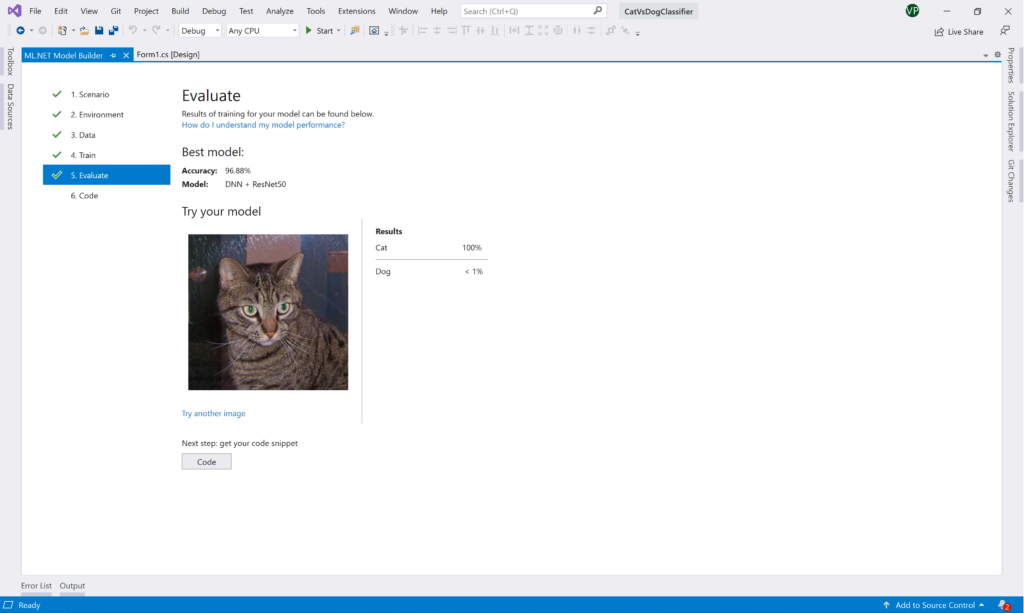
We can see that the model is certain that there is a Cat on the image. Now, let’s try dogs.
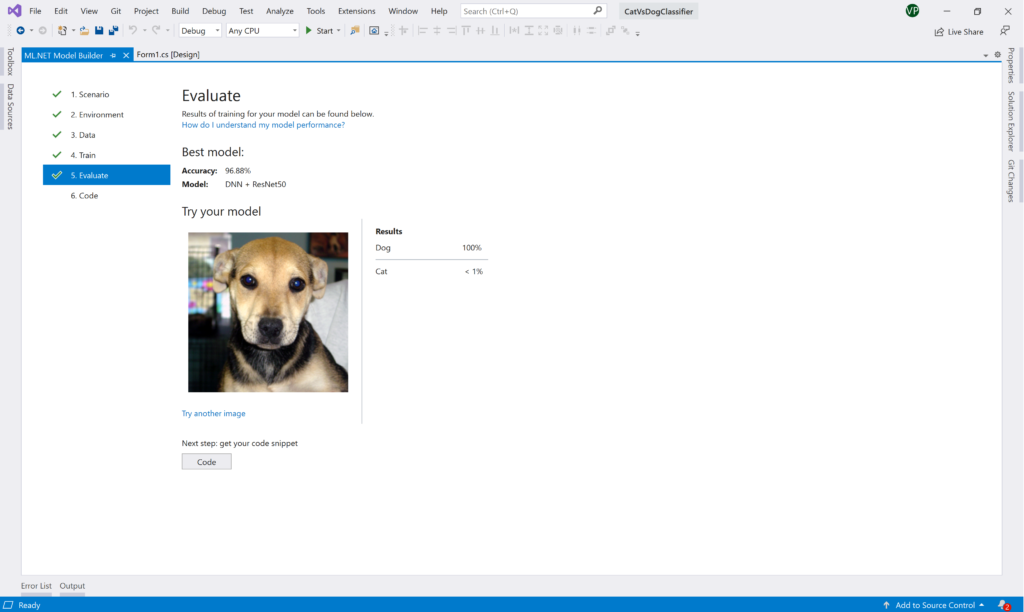
Again, the model classifies the image correctly under the Dog category.
At this point I am satisfied with the Deep Learning model that was generated for me, and I am ready to import the model into my project. Next, click on the Code button.
ML.NET Model Builder: Add the Deep Learning Model to our project
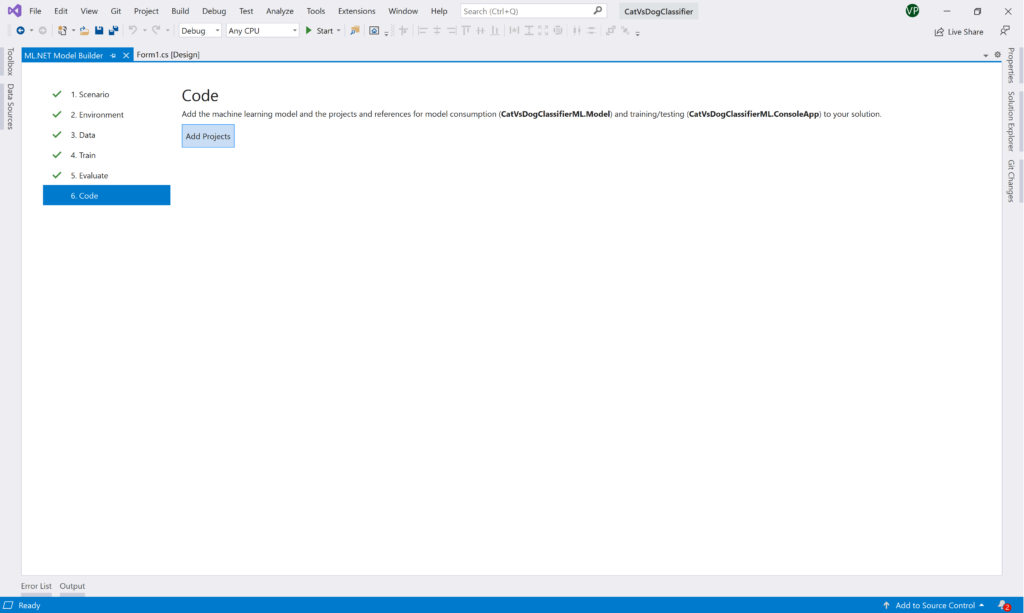
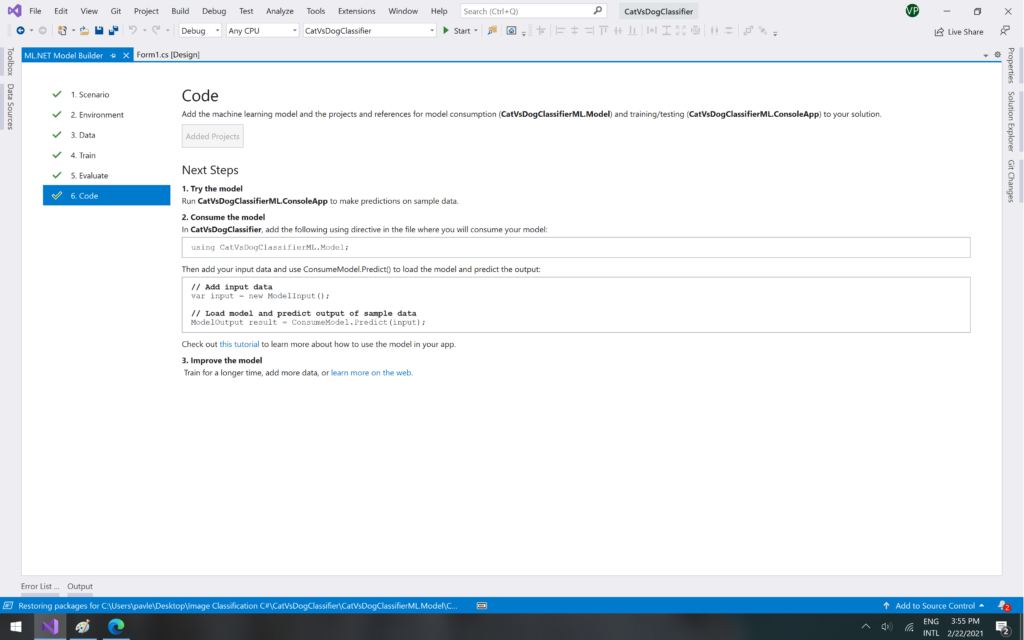
Before creating this Machine Learning project, I created a CatVsDogClassifier, so this step is optional. But if you click Add Projects, Visual Studio will create and add two more projects to your solution. The first one would be CatVsDogClassifierML.Model and the second one is CatVsDogClassifierML.ConsoleApp. The .Model project is the one we are after. Inside, there is a zip file called: MLModel.zip. This file contains our model. So, If we want to classify cat or dog images we must load it and use it.
The second project .ConsoleApp contains an example code for loading and making predictions using the model.
If you want to learn more about Neural Networks you can check the following articles:
- Build a Neural Network with C#
- How to execute ML.NET Model in .NET Framework
- Neural Network making Predictions – Part 1
- Neural Network making Predictions – Part 2
In the next article, we will see how to use the generated code