

In this tutorial we will implement Text Detection algorithm using C# and Accord.NET. The following video demos the final C# application
Text Detection with C# Project: Download
Introduction to Text Detection problem
Text detection is the process of detecting the text present in an image. Reading the text from photographs is a challenging problem. And it has received a significant amount of attention throughout the years. Usually there are two key components to a system like this. The first component being text detection followed by a character recognition.
In this post we will focus on text detection.
The motivation to solve this problem is its wide range of real-world applications. For example, image search, instant translation, robot navigation and industrial automation. Therefore, automatic text reading from natural environments has become an increasing popular and important research topic in the field of computer vision.
However, despite years of research there are still challenges to overcome when it comes down to text detection and recognition. The difficulties mainly stem from three aspects:
- Diversity and Variability of text. For example, text can be written in different languages, colors, fonts, sizes, orientation, and shapes.
- Complexity and Interference of Backgrounds. For example, text can be found on different backgrounds such as traffic signs, bricks, windows. But the text itself does not necessarily means that will be written with a simple solid pen stroke.
- Imperfect Imaging Conditions. For example, the quality of the image or video might be very low. The image might also be blurred or out of focus.
Pre Deep Learning Era
In the pre deep learning era, the research was revolving around methods confined to designing hand-crafted low-level features. Such example is the Connected Component (CC) based methods. The CC methods would segment the image into multiple potential text regions. Then, the non-text regions are additionally filtered out by using handcrafted low-level features.
However, researchers also used the sliding-window technique for text detection. Using this technique, candidate text areas were extracted. Afterwards, the candidate text blocks are then classified using different classifiers trained on handcrafted low-level features.
These techniques are quite computationally expensive because additional steps of pre-processing the image are required. Also designing features to recognize text is quite a challenging task, given the three difficulties we enumerated above. Because of them traditional methods deliver erroneous results. It may be stated that low-level hand-crafted features are highly sensitive to noise, illumination, multi-orientation of texts and other clutters.
Text Detection and Deep Learning
The advent of Deep Learning changed the game in the Computer Vision domain. Deep Convolutional Neural Networks were able to outperform every single traditional method. Mostly because low-level hand-crafted text features can get us so far. CNN’s were able to learn much more text features that we can design by hand. But they were also able to learn those features hierarchically. Learning more general features in the shallow levels. Up to a more complex ones in the deeper levels of the network.
But, before we start using Deep Learning for Text Detection, we will first revisit the basics. We will employ a simple Image Processing technique that will enable us to extract text from images. After the initial proposed text areas are obtained, we will employ simple machine learning algorithm to improve our results.
Now, let us look at the application we are going to build:
Text Detection Application

The text detection application consists of a very simple interface. It contains a File menu which allows the user to load up and process an image. Then there is a region with five parameters that we will go over in shortly. Bellow that is the image view which will present the picture.
Under the File menu there is also another option Detect Text. By default, is grayed out, but once the user loads up an image it is enabled. When this menu is clicked, the image processing algorithm will take over and propose text areas on the image.
Text Detection: Bounding Boxes
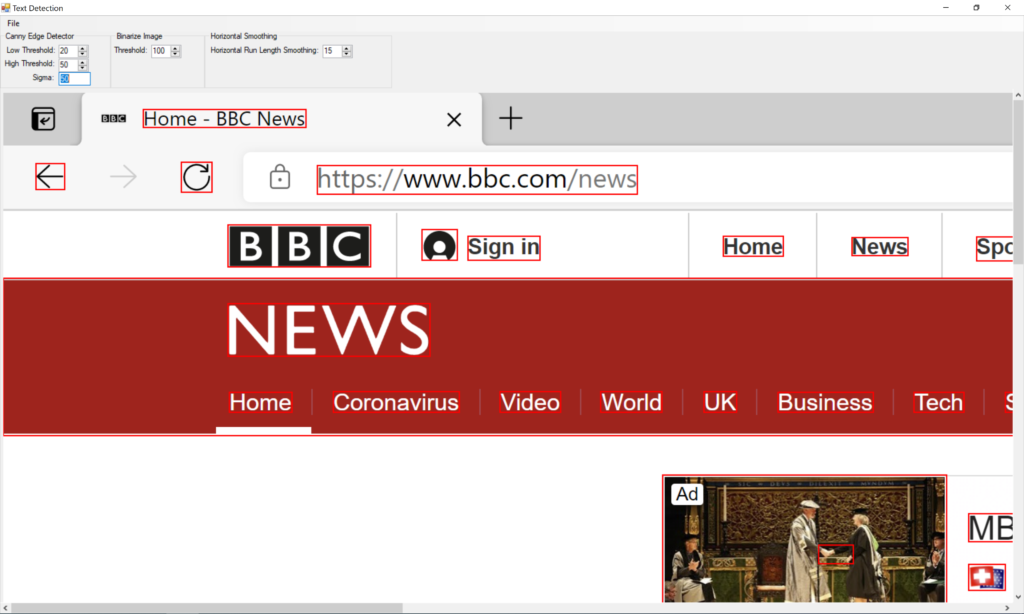
As you can see from the image above, the algorithm analyzes the image and proposes bounding boxes around areas that it believes contain text. As you can see all the text was detected. However, a lot of areas that do not contain text are inside the red bounding boxes. For example, the left arrow key, refresh button as well as the user icon next to the Sign In option.
So, what is going on?
Well, we are discussing solving the text detection problem using a Computer Vision approach. As we discussed these methods are indeed error prone. But do not worry, we will filter out those incorrect results using additional techniques. For now, we can capture all the text from the image. And that is good enough.
Later we will solve the text detection problem in C# using Deep Learning techniques.
Finally, we will compare the results. So, this should be quite a journey.
Now, let us look at another part of the image.
Text Detection: False Positives
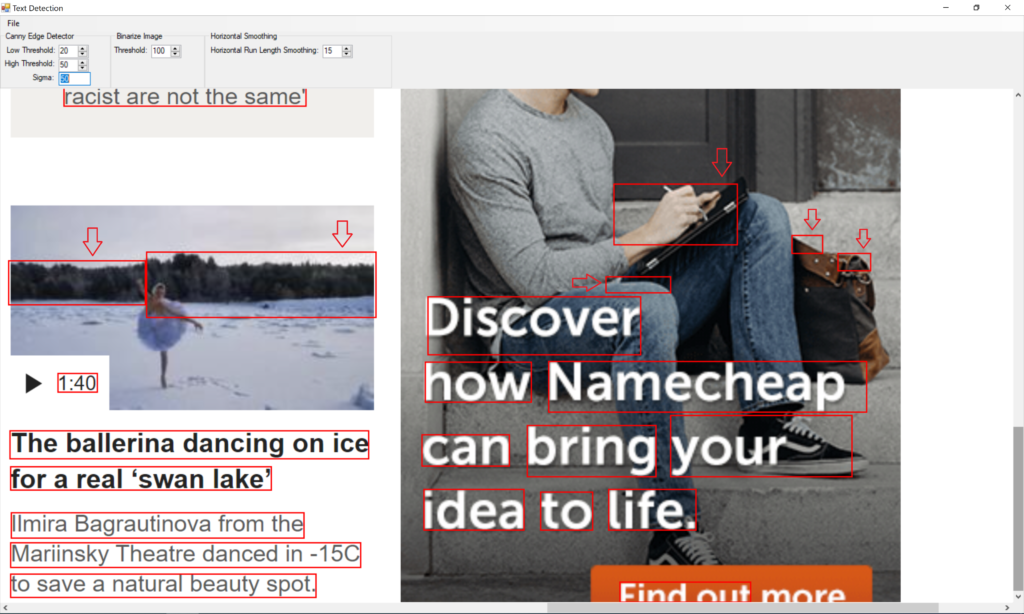
In this part of the image, we can see quite a lot of false positives. A false positive is the bounding box the text detection algorithm think it is text, but it is not. I put arrows above them so that you can spot them easily.
This is quite normal for algorithms based on image processing. Most of the science papers in this area use multi step filtering approach. And we will too. Right now, I am satisfied that all the text is inside a bounding box.
Text Detection a C# Code Walkthrough
We are now ready to peek behind the C# code that allowed us to do the text extraction. And here it is
new ImageProcessing(_pictureBox.Bitmap)
                .Grayscale()
                .DetectEdges((byte)nLow.Value, (byte)nHigh.Value, double.Parse(txtSigma.Text))
                .Dilate()
                .Binarize((int)nThreshold.Value)
                .HorizontalSmear((int)nHorizontalSmear.Value)
                .GetBlobs()
               .ForEach((rectangle)=>_textAreaFilter.Filter(rectangle, _pictureBox.DrawRectangle));
This C# application is based on a edge-based algorithm for text detection in images. First, an edge map is created using the Canny edge detector. Then morphological filtering is used, based on geometrical constraints. A connected component analysis is performed to the filtered edge map to determine a bounding box for every candidate text area.
There are two methods when it comes down to text detection.
Bottom-up method segment images into “character” regions and group them into words. They consider text regions as connected components with the same or similar color and size.
Top-down methods firstly detect text regions in images and then split them in text lines. We are using a top-down method. These methods are also divided into two sub-categories. Heuristic methods and Machine Learning methods. Heuristic methods usually use heuristic filters to detect text. On the other side, Machine Learning methods use trained, machine learning techniques to detect text. I like the latter method better. As a result, we will use a top-down approach to extract potential text areas. As you saw from the images above, we will need additional filtering to improve text detection accuracy. So, we will combine our approach with Machine Learning algorithms.
Later we will use Deep Learning and the Sliding Window technique and as a last tutorial we will do a CNN network to segment out text areas. But first things first.
Text Detection Algorithm
Out text detection algorithm in C# exploits the fact that text lines produce strong vertical edges horizontally aligned and follow specific shape restrictions. Using edges as the prominent feature gives us the opportunity to detect characters with different fonts and colors. Every character has strong and prominent edges, despite its font or color, in order to be readable.
When we are discussing low-level features, this is what we were after. A strong presence of character features. And that would be strong vertical lines. We write from left to right, so we will be looking for a horizontal alignment of the text. We will see in just a bit, that text blocks do follow some other patterns, and we will use them to filter out false positives.
C# Code
Inside our Text Detection project, we have a C# class called ImageProcessing. We will use an instance of it to do our initial Text Detection. The class takes a Bitmap object as a parameter, representing the image user has opened.
Once, the image is loaded we are executing a sequence of Image Processing operations. Let us dive deeper into each one.
Grayscale
We have discussed gray scale as an operation multiple time before. After the operation is executed, we are left with an image where each pixel is a single sample representing only the amount of light, that is, it carries only intensity information. And there is a good reason why we are doing that but let’s look at an example first.

As you can see, we lost the color component of the image. But why? Well, the answer stems from the fact that, for a text to be readable it needs to contrast the background. Also, color cannot help us to distinguish text area from a non-text area. A good high contrasting vertical edge can. So, color does not really help us in this scenario, so I decided to take it away.
Edge Detection
We already mentioned that we want to find a good low-level text feature. Well strong vertical edges horizontally aligned that follow a specific shape restriction is a good way to start. As a result, in this step we will generate an edge map using Canny edge detector. And we will apply it on our gray scaled image.
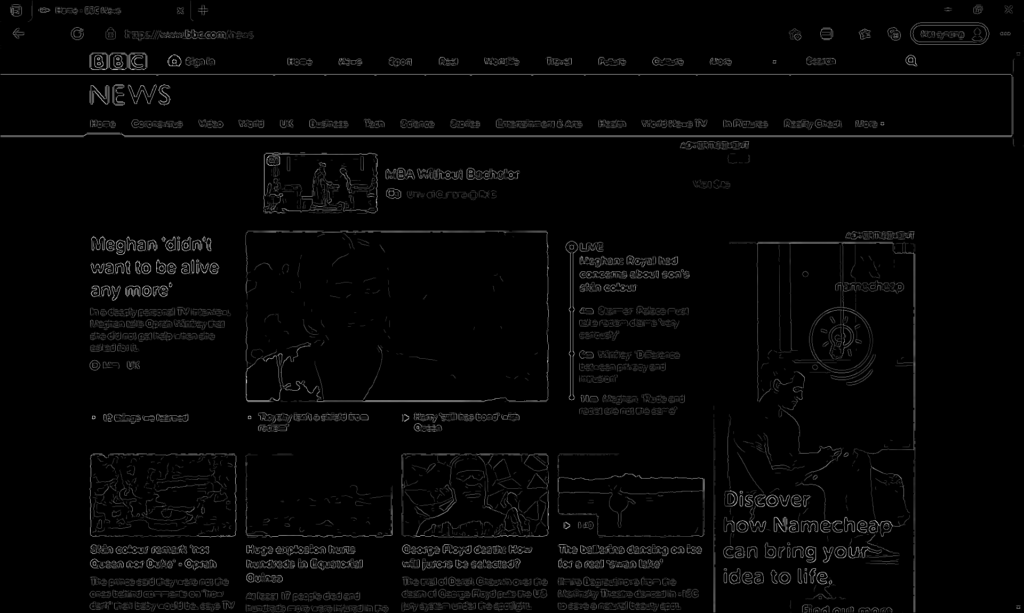
This is the result when we apply the Canny edge detector to our gray scaled image. As you can see the most expressed lines here are the lines that form text. Of course, there are others as well, but we have filtered out quite a bit of content out, by using this technique. Remember, the idea behind the algorithm is to apply a filtering process as much as we can before we apply Machine Learning. And this is leading us one step closer to our desired result.
Next, we need to find a way to connect our detected line components.
Dilation Technique
The idea behind dilation technique is to express the line features even more. And maybe even connect them together. Making connection between the letter lines will form rectangles that contain words. As of this moment we can maybe extract letters. But we want more. We want a complete word/sentence or even a whole text area. Let us see how this works

Just by looking at this result, we can see that the text features are even more expressed. We do have overlapping characters which is good, but not all are. So, we will need an additional step.
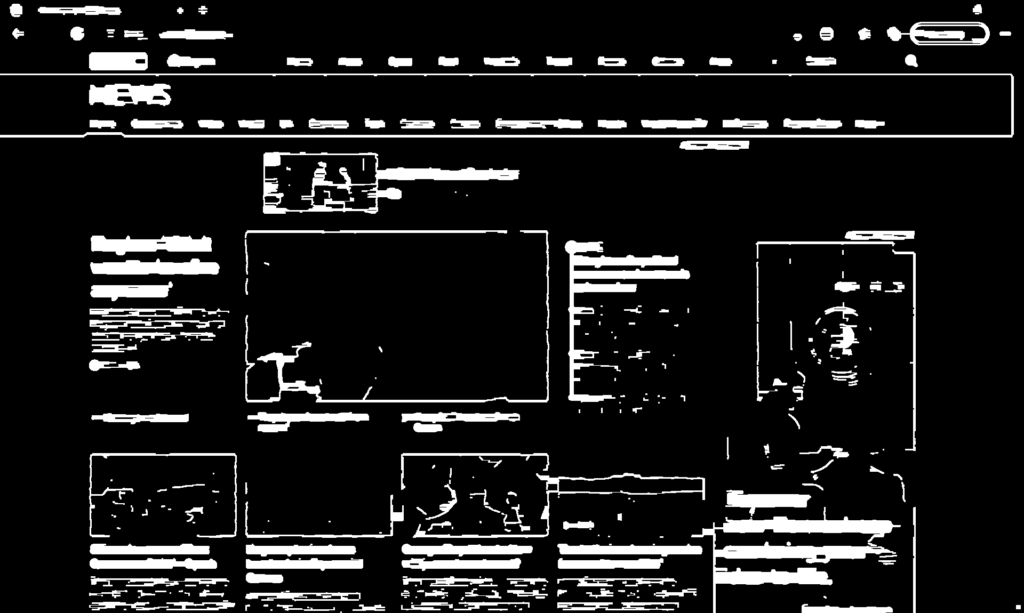
Binarization of the image
Just like with gray scale we have used this operation before. Binarization is the procedure of converting the image to black and white image. Each pixel in the image will have one of two colors, white or black. This is a good idea at this point. Because low level intensity edges are still present, and we want them out. When I say intensity, I mean their grayscale intensity. As you already know the gray scale intensity can range from 0 to 255. Zero being a black pixel and 255 is a white one. This means that the higher the pixel intensity the higher is the probability that this pixel is part of a text component. On the other side, a pixel that contains lower intensity is most likely not part of a text component. So, let us now filter them out.

Take a look at the central picture. A lot of the lines that formed a face are now gone and filtered out. Now we have pixels that are predominantly part of text areas. But they are not yet connected into text blocks. So, let us do that next.
Horizontal Line Length Smoothing
Horizontal line length smoothing is an algorithm that connects pixels if the distance between them is lower than a specific threshold. Because text characters usually are very close to each other, we can set the threshold to be between 10 and 15 pixels. So, if the distance between two pixels is less than 15 pixels, this algorithm will connect them together. For example:
Now we have something interesting. All our characters are connected to each other. But not only that, we are even forming a sentence. Do you remember when we mentioned “vertical edges horizontally aligned”? Well, this is it. Right now, we have formed text areas. They are not perfect but remember this is a process. Next, we will draw bounding boxes around our proposed text areas.
Bounding Box
A bounding box is a rectangle that will display the proposed text region. To do that we need to find the rectangles. We can do that by using the Blob Counter class from Accord.NET. This class allow us to create the bounding box we are looking for. All we have to do is call the GetObjectsRectangles method which will return a C# Rectangle array.
Text Area Filtering
Next step is optional, since we will do our filtering using Machine Learning, but let’s take a look anyway.
To improve our text detection algorithm, we can use this filtering technique. For example, if a bounding box is a very small rectangle, or if the height of the rectangle is bigger than the width, then it is not a text area. This conclusion is taken from just by looking at our picture. A text area is a rectangle that its width is couple of magnitudes bigger than its height. Just look at our result from the Horizontal Line Length Smoothing process.
Text Detection with C# a Conclussion

The text detection is not perfect, and we are not done yet. In the next article we will see how to use Machine Learning to dismiss the false positives that are polluting our result.