
In this guide we are going to cover how to create Transparent Image using C#.
Full Source Code is available at:
DevInDeep/TransparentImage (github.com)
What is a Transparent Image?
Digital images are composed of discreet picture elements called pixels. Each pixel’s color sample has three numerical RGB components. Those are Red, Green and Blue. They represent the color of that tiny pixel area. These three RGB components are three 8-bit numbers for each pixel.
In order to obtain transparency, we must add additional channel – “Alpha”. RGBA stands for Red Green Blue Alpha. This represents a three channel RGB color model supplemented with a fourth Alpha channel. While RGB describes the combination of the Red, Green and Blue intensities of each pixel, the Alpha channel indicates how opaque each pixel is.
So if we want to create transparent image, we need a graphics file format that supports RGBA color palette. Or simply put, a transparency channel.
Portable Network Graphics
Portable Network Graphics also known as PNG, is a graphics file format that supports lossless data compression. PNG supports 24-bit RGB or 32-bit RGBA color images, as well as grayscale images (with or without the transparency channel).
What we are going to build in this tutorial, is an application that can read any type of image. Select any color, that we want to mark as transparent, and set a tolerance level. Finally, we will save the image as a PNG on our local PC.
So let’s take a look at the application itself.
Transparent Image Application in C#
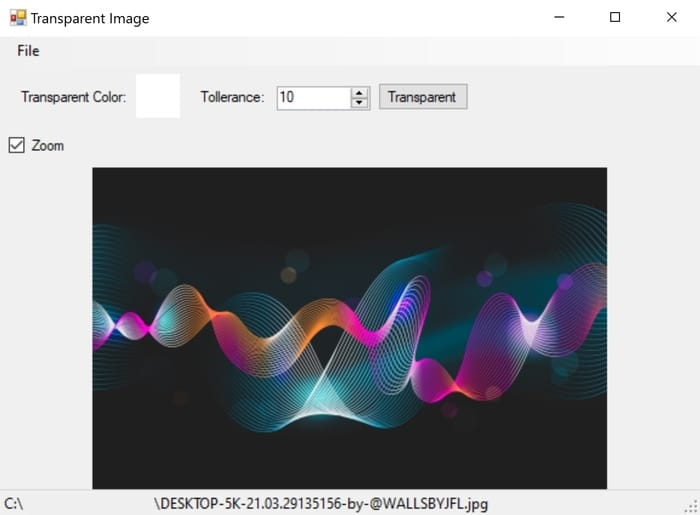
In this tutorial we are going to build a simple prototype application. It is going to support the transparency feature.
Let’s kick it off with the File menu. The File menu offers the user three possibilities: Open Image, Save Image and Exit.
The menu option are pretty self explanatory. So we are not going to dive deep into them. But, one of the main components of this app is the Scrollable Picture Box Control.
We did create this control as a stand alone project some time ago. You can read more about it here:
How to Create Scrollable PictureBox Control in C# – CODE-AI (devindeep.com)
At the top of this application there is a tool bar. The first option it offers is for the user to choose the color he wants to substitute with transparency. But, more often than not, we would like to create transparency of color gradients that are close to the one we select. Here is where the Tolerance feature comes into play. It allows the user to choose a tolerance level between the selected color and nearby colors that would end up being transparent.
Then, we have the Transparent button. If the user clicks that button it will take the loaded image and create transparency. Once the operation is done, the transparent image will be displayed in the Scrollable Picture Box. Then the user may opt to save the transparent image locally.
Currently the application supports saving the image in PNG format. Obviously, this is because this image type does support transparency.
Usability
When I am posting to my blogs, I constantly need to process images. For example, I would need to resize them, select compression algorithm and in some cases create a transparent image background. So, having an application like this could save you a lot of time. Specifically, when posting phone images on TechInDeep. It requires me to create transparency around the phone edges. And I am using the algorithm we are going to create in this post.

Transparency
.NET Framework comes equipped with a Bitmap class. Bitmap is an object used to work with images defined by pixel data.
The way we can instantiate object of the Bitmap class is by passing the file path of an image like so:
var bitmap = new Bitmap(imageFilePath)To select an image from your computer you can use OpenFileDialog Class. This class displays a standard dialog box that prompts the user to open a file. We can simply use it like this:
using(var ofd = new OpenFileDialog())
{
     ofd.Title = "Open Image";
     ofd.Filter = "Image Files| *.jpg; *.jpeg; *.png; *.bmp; *.tiff;";
     if (ofd.ShowDialog() == DialogResult.OK)
          var bitmap = new Bitmap(ofd.FileName);
}
In the previous code snippet we are instantiating an object of the OpenFileDialog class. Then we set the title to “Open Image”. Since, we want to open an image file, that means we also have to specify the filter. And in our code it is set to show only: jpg, jpeg, png, bmp and tiff files. Feel free to add other supported image file types.
Finally, when the user selects a file and clicks on the OK button, we are creating a new Bitmap object from the selected file path. Although, the bitmap just hangs, please note that this is just an example. Instead, you can assign it to a PictureBox control. That is up to you. To set the newly create Bitmap object to a PictureBox control, you need to assign the bitmap to the Image property, like so:
pictureBox.Image = new Bitmap(ofd.FileName);Make Image Transparent using .NET Framework
So, we know how to open image, and read it into a Bitmap object. It’s time to see how we can create transparent image.
First of all, .NET already provides a method to do exactly that. MakeTransparent is the function we are going to be using but, with small changes. There are two overrides to it:
- MakeTransparent() which makes the default transparent color transparent for this Bitmap.
- MakeTransparent(Color) which makes the specified color transparent for this Bitmap.
For our purposes we are going to use the second option. We want to specify which color to make transparent. As an addition, we would also like to implement a tolerance level.
Let’s see the complete code for the “make bitmap transparent method”
private Bitmap MakeTransparent(Bitmap bitmap, Color color, int tolerance)
 {
     Bitmap transparentImage = new Bitmap(bitmap);

     for (int i = transparentImage.Size.Width - 1; i >= 0; i--)
     {
          for (int j = transparentImage.Size.Height - 1; j >= 0; j--)
          {
               var currentColor = transparentImage.GetPixel(i, j);
               if (Math.Abs(color.R - currentColor.R) < tolerance &&
                    Math.Abs(color.G - currentColor.G) < tolerance &&
                    Math.Abs(color.B - currentColor.B) < tolerance)
               transparentImage.SetPixel(i, j, color);
          }
     }

     transparentImage.MakeTransparent(color);
     return transparentImage;
}
Transparent Image code Walkthrough
So, there is a lot going on here. I am not advocating for this type of code, but just bare with me a second. We will improve our code in the next section. This is a method that you can use to create a transparent image with a predefined level of tolerance.
The first line of code creates a new bitmap instance based on the image we’ve already opened. It will hold the processed or transparent image.
Next, we have two for cycles. We are basically enumerating each pixel from the image. And for each pixel we get the Color structure. It represents an ARGB (alpha, red, green, blue) color.
The if condition checks if the current pixel color is well within the tolerance level. If it is, then set that pixel color as our predefined transparent color. If it is not, then we are not changing that pixels color structure. We need to do this because when we are using the MakeTransparent method (provided by the .NET Framework), it requires us to pass the Color structure we want to make transparent.
What we are doing here, is making all the pixel (that have pixel color values close to the transparent color we have previously chosen) have same color as the user selected transparent color.
As a result, every single pixel which has the transparent color assigned to it, the MakeTransparent method will then replace that pixel with transparency.
Finally, we are simply returning the new transparent image we have created.
Refactoring
The code we have seen so far is a bit cryptic. C# allows the developers to be very expressive with their code. So, is it possible to refactor our solution to be more readable and comprehensive?
Well, I believe we can do that.
Extension Methods in C#
First of all, we are going to be using the power of extension methods. First and foremost, I want my method to be attached to the Bitmap itself, just like MakeTransparent is at the moment. The only difference between this two is the tolerance parameter.
For that purpose we need to create a new static class. Let’s call it BitmapExtensions. Inside we are going to code the following method:
public static Bitmap MakeTransparent(this Bitmap image, Color color, int tolerance)
{
     var resultBitmap = new Bitmap(image);

     resultBitmap.ForEachPixel((i,j,pixelColor) => {
          if (pixelColor.IsCloseTo(color, tolerance))
               resultBitmap.SetPixel(i, j, color);
     });

     resultBitmap.MakeTransparent(color);

     return resultBitmap;
}
The benefit of using Extension Methods in C#
Again, we are going to create our resulting Bitmap instance from the input image. As you can see here, I am using a ForEachPixel method from the Bitmap object. This method doesn’t really exist in the Bitmap class. So this is also an extension method as well. The purpose behind it is that, I wanted to move out the infrastructure code of pixel enumeration in its own method, exactly where it belongs. And this is it. Now, ForEachPixel is an extension method attached to the Bitmap object. And anytime I want to enumerate each pixel from an image, I can simply call upon this method. It is much more easier and comprehensive than having two nested for cycles every time when I want to enumerate the pixel color values.
Here is the implementation:
public static void ForEachPixel(this Bitmap image, Action<int,int,Color> onPixel)
{
     for (int i = image.Size.Width - 1; i >= 0; i--)
     {
          for (int j = image.Size.Height - 1; j >= 0; j--)
          {
               onPixel(i,j,image.GetPixel(i, j));
          }
     }
}
Pretty simple implementation. This method is very convenient, expressive and self explanatory on what it does. It is also abstracted away from the client logic. This means that anytime I want to improve the performance of Get/Set pixel, with a little tweaks I can do that here. The calling code will not even know the difference.
To check if the current pixel color is well within the tolerance level, we needed that if statement that I have abstracted away in another class. To do that just simply create a new class and name it: ColorExtensions.
Checking if certain color structure is within some predefined tolerance level is a job for another class. Inside ColorExtension write the following method:
public static bool IsCloseTo(this Color color, Color anotherColor, int tolerance)
{
     return Math.Abs(color.R - anotherColor.R) < tolerance &&
          Math.Abs(color.G - anotherColor.G) < tolerance &&
          Math.Abs(color.B - anotherColor.B) < tolerance;
}
This method simply returns true if a color is well within the tolerance level of anotherColor. If it is not, then it will return false.
Back to the main method
Now, let’s get back to our code inside MakeTransparent method. Inside, we can use the IsCloseTo method to check if the color is within the tolerance we have set. If it is, then we set the color to that pixel as the transparent color the user has chosen.
Finally, we can call the MakeTransparent method that .NET Framework provides, and return the resulting image.
This code does the same exact thing, except that it also provides a better readability to the user.
Image Processing Optimization
There is another way to process each pixel in an image. This GetPixel and SetPixel methods are quite slow. The reason Bitmap operations are so slow in C# is due to locking and unlocking. Every operation will perform a lock on the required bits, manipulate the bits, and then unlock the bits.
You can vastly improve the speed by handling the operations yourself. But, this is a topic for another time. Until then, this should do it.
The Result: Transparent Image
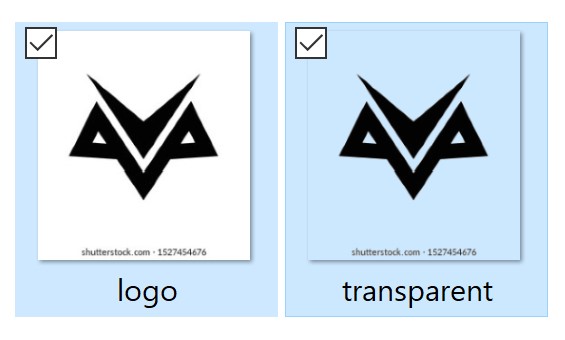
Here is an example of the output from the application. On the left side there is a logo with white background. On the right side it is the same logo but with transparent background.
First we launch the application. Select the image we want to process. Once the image is loaded, we can select the color we want to make transparent. In this case I wanted my white background to be transparent. So I selected the color: White. Next, I set the tolerance level to 10, just in case. This option is particularly good when there are other pixel intensities close to the white color, but not quite. This means that color intensities close to the color we’ve chosen will also make the cut, and the application will render them transparent.
The best way to work with the Tolerance feature is to play around with it, and see what value suites your needs the best.
Anyway, we now have the desired application.
Conclusion
Creating a Transparent Image using C# is just the beginning of a much larger project. This will lead us to more Image Processing algorithms and features. I think we will keep on adding additional features to this application, but explain them in a separate post.
Features like image conversion, resizing and many others. Ultimately we might end up with a simple image processing and viewer application.
So, make sure to check out what’s coming up next.