
Tree Data Structure is a non linear structure that mimic hierarchical tree-like structures with a set of connected nodes. Today, we will see how to create and use such hierarchical data structure. And later in the tutorial we will demonstrate how to filter the data.
How to create Tree Data Structure in C# – Source Code
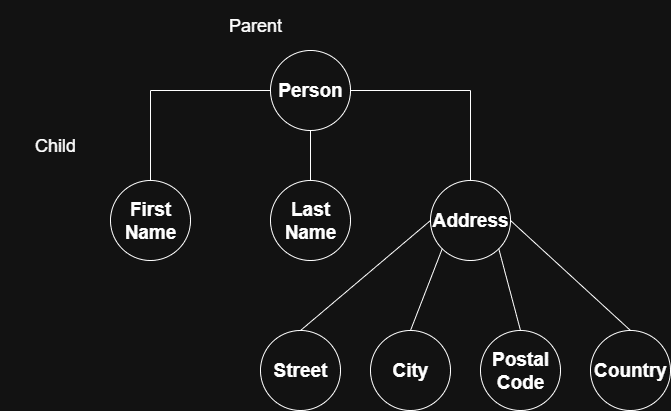
The image above represents a nice little example of what we will examine in this C# tutorial.
As you can see from the image above, there are two types of nodes. A parent and a child. This relationship defines how the data is organized in a Tree Data Structure. A node can have a Parent and can host multiple Children. We can use this structure to represent complex relationships, such as organizational charts or file systems, where data is nested within other data.
In our example we will try to store a Persons data. Like first name, last name and address. But, we can see that the Address node is a complex one. It actually contains multiple children: Street, City, Postal Code and Country.
Before we represent this Tree Data Structure visually we will first create it.
Tree Data Structure in C#
internal class TreeNode<T> : IEnumerable<TreeNode<T>>
{
    public T Data { get; set; }
    public TreeNode<T> Parent { get; set; }
    public ICollection<TreeNode<T>> Children { get; set; }
    public TreeNode(T data)
    {
        Data = data;
        Children = new LinkedList<TreeNode<T>>();
    }
    public IEnumerator<TreeNode<T>> GetEnumerator()
    {
        yield return this;
        foreach (var child in Children)
        {
            foreach(var anyChild in child)
                yield return anyChild;
        }
    }

    IEnumerator IEnumerable.GetEnumerator() => GetEnumerator();
}
If you remember our definition from before, you will realize that we have the exact parent-child relationship implemented in our code. What is notable to remember is that this data structure can be generic. As such, we define it as: TreeNode<T>
For easy access of the Tree Nodes we implement IEnumerable<T>. Before continuing on with this tutorial, make sure to brush up on your knowledge of collections.
So, we define the nodes Data, Parent (which is a reference to another node) and Children (which is a collection of nodes). Now let’s see how to use this collection.
Create Hierarchical Collection
TreeNode<string> person = new TreeNode<string>("Person");
person.Children.Add(new TreeNode<string>("First Name"));
person.Children.Add(new TreeNode<string>("Last Name"));
TreeNode<string> address = new TreeNode<string>("Address");
address.Children.Add(new TreeNode<string>("Street"));
address.Children.Add(new TreeNode<string>("City"));
address.Children.Add(new TreeNode<string>("Postal Code"));
address.Children.Add(new TreeNode<string>("Country"));
person.Children.Add(address);
return person;
As you can see, creating a persons Tree Data Structure is quite easy. We first define the root node Person. Then we add it’s children: First Name, Last Name and Address. Please note, that Address has four other children. As such I create the address as a separate statement and then add the children: Street, City, Postal Code, Country. At the end I am adding the Address node to the root Person node.
Visual Representation
In order to visualize this tree node data structure, we will need to following XAML code into our MainWindow.
<Window
    x:Class="Hierarchical_DataStructure.MainWindow"
    xmlns="http://schemas.microsoft.com/winfx/2006/xaml/presentation"
    xmlns:x="http://schemas.microsoft.com/winfx/2006/xaml"
    xmlns:d="http://schemas.microsoft.com/expression/blend/2008"
    xmlns:local="clr-namespace:Hierarchical_DataStructure"
    xmlns:mc="http://schemas.openxmlformats.org/markup-compatibility/2006"
    Title="MainWindow"
    Width="800"
    Height="450"
    Loaded="MainWindow_Loaded"
    mc:Ignorable="d">
    <Grid>
        <Grid.RowDefinitions>
            <RowDefinition Height="50" />
            <RowDefinition Height="*" />
        </Grid.RowDefinitions>
        <TextBox
            x:Name="txtSearch"
            Grid.Row="0"
            VerticalContentAlignment="Center"
            FontFamily="Segoe UI"
            FontSize="24"
            TextChanged="txtSearch_TextChanged" />
        <TreeView
            x:Name="treeView"
            Grid.Row="1"
            FontFamily="Segoe UI"
            FontSize="18" />
    </Grid>
</Window>
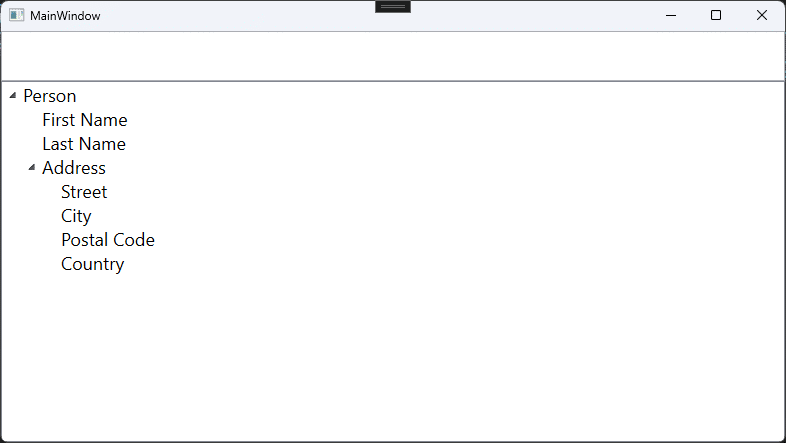
In the MainWindow we only have a TextBox and a TreeView controls. When the window loads the data is loaded into the tree view. When the user types a string, that string is used to filter out the Tree View control. It’s as simple as that. If you need more information please revisit the previous article.
C# Implementation of Filter Operation
public partial class MainWindow : Window
{
    public MainWindow() => InitializeComponent();
    private void MainWindow_Loaded(object sender, RoutedEventArgs e) =>
        treeView.ItemsSource = TestData.FetchTestData().Convert();
    private void txtSearch_TextChanged(object sender, TextChangedEventArgs e) =>
        treeView.Items.FilterBy(predicate);
    private bool predicate(TreeViewItem item) =>
        item.GetHeaderOrEmpty().StartsWith(txtSearch.Text, StringComparison.OrdinalIgnoreCase);
}
If for some reason you are not able to understand the code, then you should review the previous article. In this tutorial we will focus only on the filtering logic for the hierarchical data structure.
Basically we will be dissecting the following statement:
treeView.Items.FilterBy(predicate);Filter operation on Tree Data Structure
internal static void FilterBy(this ItemCollection collection, Func<TreeViewItem, bool> filter)
{
    collection.Do<TreeViewItem>(item => item.Collapse());
    collection.Where<TreeViewItem>(filter).ToList().Do(item => item.ExpandParentStructure());
}
In order to filter the data inside the Tree View, we first must collapse all nodes. The idea is to expand the node that satisfies the predicate function, but because this is a hierarchical structure, we will expand its parent nodes as well. Otherwise, if we only expand the child node, the Tree View will not display anything. This is because the parent node is collapsed and as a result the child node is collapsed as well.
This code is very similar like the one in the previous tutorial. Because of that, we will examine the ExpandParentStructure method.
ExpandParentStructure C# implementation
internal static void ExpandParentStructure(this TreeViewItem treeViewItem) =>
    treeViewItem.HierarchyWalk().Do(item => item.Expand());
As you can see, this code is quite simple as well. We will get a sequence of the nodes parents via the HierarchyWalk method. Then we will iterate over them and call Expand function on each. This will result by expanding the searched node, as well as his parents.
Having said this, we need to implement HierarchyWalk method. This is its C# implementation:
internal static IEnumerable<TreeViewItem> HierarchyWalk(this TreeViewItem treeViewItem)
{
    TreeViewItem tempItem = treeViewItem;
    yield return tempItem;
    while (tempItem.Parent != null)
    {
        yield return (TreeViewItem)tempItem.Parent;
        tempItem = (TreeViewItem)tempItem.Parent;
    }
}
There is not much to explain here either. This C# code snippet returns the current TreeViewItem control that satisfies the given filter, then it iterates over its parents. Each parent is returned so that we can expand it as well.
Tree Data Structure Filtering Demonstration
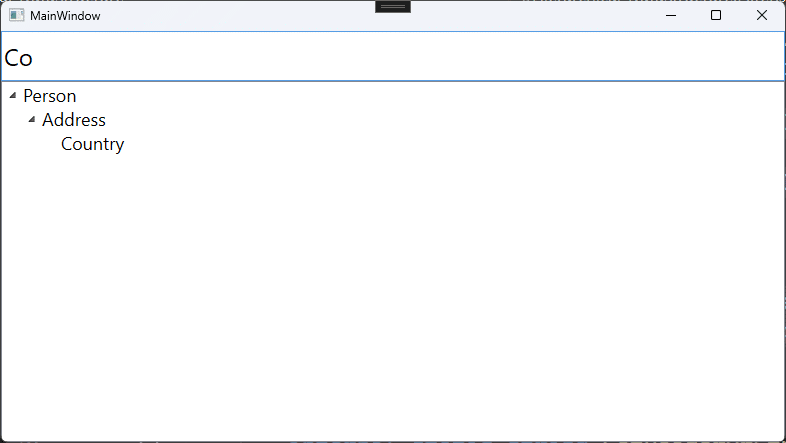
As you can see it in the demonstration video, and from the image above, as soon as I start typing the Tree View items are filtered. So, if I start typing: Co it will match the node: Country. This is because of the predicate we defined in the MainWindow.cs file. The important thing to note is that now, we are also expanding it’s parents: Address and Person.
Conclusion
In this tutorial we saw how to implement basic Tree Data Structure. We created one, and displayed it into a Tree View control in a WPF project. As a bonus, we added filtering operation.