
Hey guys, in this article we are going to learn how to implement Drag and Drop in WPF C#.
How to Implement Drag and Drop in C# – Source Code
Drag and Drop in WPF
Drag and Drop commonly refers to the process of data transfer. Most of the time we use it to select one or more files. At least in our case. But you can use this process to do the same with other types of data. This article will cover the basics and will focus on files. Later on, we can discuss the drag and drop process for other types of objects.
So, like we discussed earlier, drag and drop is the process of selecting the files, dragging them over some desired drop target in the user interface, and dropping them.
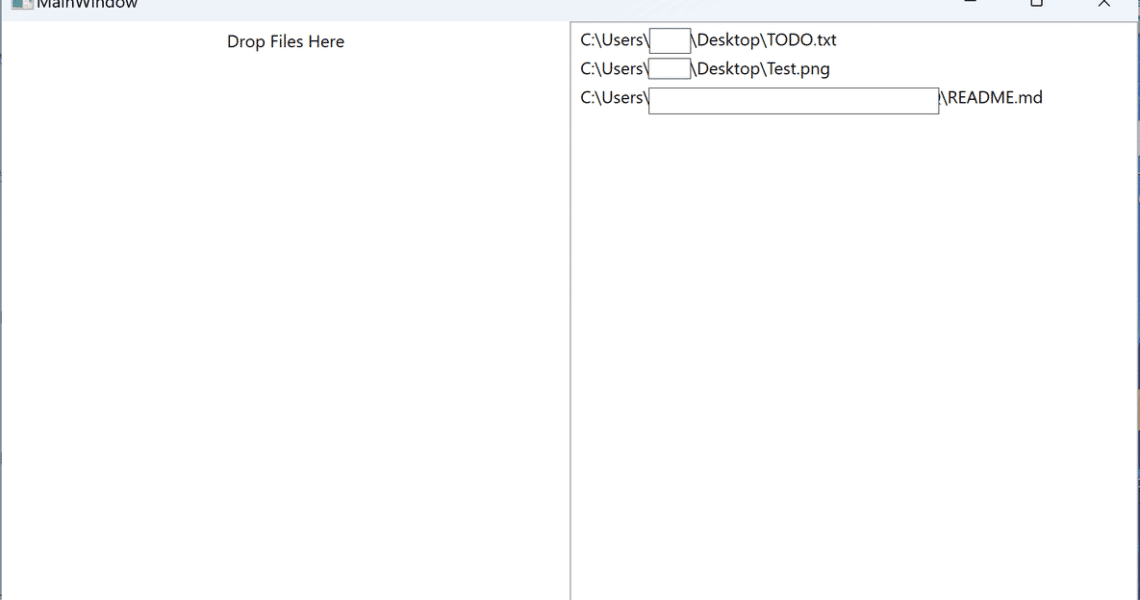
What we are going to build
As you can see, we are going to build a very simple WPF C# application. This should be enough to demonstrate the drag and drop functionality.
We have a main window with a grid that contains two columns. The left side will be the target to drop files while the right side contains a list of dropped files. To display the list, we use ListBox control. You have already noticed that I have redacted part of the string for obvious reasons. I assure you, that will not happen in your application.
More on DevInDeep
- How to Create Round Corner TextBox Control
- How to Create Round Button Control
- How to Automate Web Browser
The functionality of this application is quite simple as well. You can select a file from your computer. Drag it over the left side on the UI and drop it. The file path will immediately display in the list box on the right side. If you select, drag then drop multiple files, all of them will be displayed.
Now, try the same but drop the files on the right side. Dropping the files over the ListBox control has the same effect. It will display the dropped file paths of the files. We will discuss this later while writing the code.
We are presenting only the basic idea. Getting the file path. Because, if you have the file path, nothing stops you for further processing the file. For example, if you drop an image, you can display it. If you happen to drop a text file, you can display its contents and so on. You get my point.
Next, let’s see how we can implement this functionality in WPF and C#.
The Code
First, we will start by creating the user interface. So, in the main window open up the design view. Once there, you will see the initial XAML code. Under the Window tag you must set AllowDrop to True, and handle the Drop even like so:
<Window x:Class="DragAndDrop.MainWindow"
    xmlns="http://schemas.microsoft.com/winfx/2006/xaml/presentation"
    xmlns:x="http://schemas.microsoft.com/winfx/2006/xaml"
    xmlns:d="http://schemas.microsoft.com/expression/blend/2008"
    xmlns:local="clr-namespace:DragAndDrop"
    xmlns:mc="http://schemas.openxmlformats.org/markup-compatibility/2006"
    Title="MainWindow"
    Width="800"
    Height="450"
    AllowDrop="True"
    Drop="File_Drop"
    mc:Ignorable="d">
<Grid></Grid>
</Window>
As you can see, we have set AllowDrop to true and we have created a new event handler called File_Drop for the Drop event.
AllowDrop="True"
Drop="File_Drop"
The AllowDrop property is very important. When set to true it enables the control to accept dropped objects. Setting this property on the main window means that the main window will act as the drop target. In turn, this enables the Drop event to be fired.
If we set the AllowDrop property to true but we never handle the Drop event, then this is all for nothing. We have to handle the Drop event.
More on Drag and Drop
In this tutorial we are only handling the most basic scenario. As a result, we are setting the only two properties we need. But in reality, there’s more you can do. There are at least two other events that you might want to handle:
It’s almost always a good idea to handle these events as well. Because you might want to change the background color when user hovers over the files on the drop target. Maybe the background color would be green if the user has the right files and red if the user tries to import files that we do not want.
Then you can use DragLeave to change the background color of the drop target control to normal. Please note that this functionality is not used only for files. If we have two or more ListBox-es we might want to transfer data from one ListBox to other.
In another tutorial we will see how to handle transfer of data via drag and drop from one control to another. In that case we would also need to handle the DragOver event. This is because we would need to know under which node of the ListBox we are trying to transfer the data. Then it is up to us if we want to create a new child node or update the current node. But more on that some other time.
Designing the UI
The rest of the XAML code should be placed under the Grid tag and it should look like this:
<Grid>
        <Grid.ColumnDefinitions>
            <ColumnDefinition Width="*" />
            <ColumnDefinition Width="*" />
        </Grid.ColumnDefinitions>
        <Label
            Grid.Column="0"
            Height="30"
            HorizontalAlignment="Center"
            VerticalAlignment="Top">
            Drop Files Here
        </Label>
        <ListBox x:Name="filesList"
            Grid.Column="1" />
    </Grid>
Here we see a Grid tag with two columns. The two columns have equal width which means that each will take 50% from the UI space. On the left side or also programmatically knows as Column 0 we have a simple Label control. It only displays the text: “Drop Files Here” and it is centered on the top. On the other side we have a ListBox control.
Now, let’s look at the C# code.
The File Drop C# Code
private void File_Drop(object sender, DragEventArgs e)
{
    if (e.Data.GetDataPresent(DataFormats.FileDrop))
    {
        string[] filePaths = e.Data.GetData(DataFormats.FileDrop) as string[];
        if (filePaths != null && filePaths.Length > 0)
        {
            foreach(string filePath in filePaths)
                filesList.Items.Add(filePath);
        }
    }
}
When the Drop event is raised an argument of type DragEventArgs is passed. This class contains relevant data to the drag and drop event. One of the methods we use is GetDataPresent in which we specify FileDrop argument which is a type object representing the format of the data for which to search. The method returns Boolean which determines whether data stored in this DataObject is associated with the specified format.
Or in other words, if a user has dropped an object (or file in our case), this method will return true.
Next we want to cast the result to an array of string. This is because when you drop a file the result is represented by the file path. This way we get a pointer to the file in question. Please note, that the drop can be a TreeViewItem for example. This is usual when we drag one TreeViewItem onto TreeView control. So, by casting we make sure that we get a string representing the file path.
Once we are sure that the casting is successful (by making sure the filePaths array is not null), we can also verify that is not empty as well. This check is redundant in our case since the foreach loop will do nothing if the array is empty. But, for other types of scenarios you might want to make sure you have files to work with.
And at the end we do a simple file enumeration and add the dropped file paths into the ListView control. Do note, that you can do whatever you want with the file (once you have their respective file path), but for the purposes of this demo, we will end it here.
ListView Drag and Drop functionality
Another thing to note is that the ListView has this feature enabled out of the box. If you did not notice we never wrote a drag and drop C# code for the ListView functionality. But it doesn’t matter because it works by default.
Conclusion
Well, there you have it. We have built a drag and drop application from scratch. But, this is only the beginning. Next we will see how to drag and drop other objects as well. So stay tuned.