
In this post we will discuss how to filter TreeView control using C# in a WPF project. It is a search functionality where you can search for a specific items inside a list. The list is hosted in a TreeView control.
How to Filter TreeView in C# and WPF – Source Code
The search will be performed by the user who will be typing a text inside a TextBox control.
Why would you like to filter TreeView?
Like I said before, this is more of a search functionality. Imagine having a large list of items and they are hosted inside a TreeView. The user must scroll down to find a particular item. This is not a good solution with large lists.
A better way to do this is to allow the user to input some text, then match that text against the items in a list. Then, only show the matched items. Now, the solution provided in this blog post is using ItemCollection class. This means that you can apply the same code to other controls as well. But, first things first. Let’s see how to implement a filter TreeView functionality in our WPF project.
Design the main window
<Window
    x:Class="FilterTreeView.MainWindow"
    xmlns="http://schemas.microsoft.com/winfx/2006/xaml/presentation"
    xmlns:x="http://schemas.microsoft.com/winfx/2006/xaml"
    xmlns:d="http://schemas.microsoft.com/expression/blend/2008"
    xmlns:local="clr-namespace:FilterTreeView"
    xmlns:mc="http://schemas.openxmlformats.org/markup-compatibility/2006"
    Title="MainWindow"
    Width="800"
    Height="450"
    Loaded="MainWindow_Loaded"
    mc:Ignorable="d">
    <Grid>
        <Grid.RowDefinitions>
            <RowDefinition Height="50" />
            <RowDefinition Height="*" />
        </Grid.RowDefinitions>
        <TextBox
            x:Name="txtSearch"
            Grid.Row="0"
            VerticalContentAlignment="Center"
            FontFamily="Segoe UI"
            FontSize="24"
            Text=""
            TextChanged="txtSearch_TextChanged" />
        <TreeView
            x:Name="treeView"
            Grid.Row="1"
            FontFamily="Segoe UI"
            FontSize="18" />
    </Grid>
</Window>
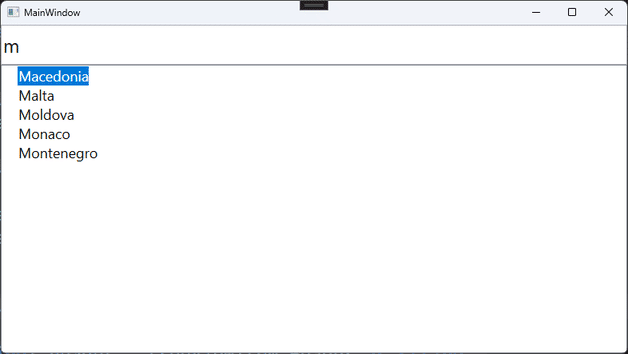
As you can see the main window is pretty simple. It contains a TextBox control and a TreeView control. The user will write the search term inside the TextBox control and the TreeView control will filter its contents. Quite simple.
Please note the two registered events:
- MainWindow_Loaded
- txtSearch_TextChanged
C# Implementation of the Loaded event
private void MainWindow_Loaded(object sender, RoutedEventArgs e) =>
treeView.ItemsSource = Data.FetchTestData().Convert();
In order to be able to filter TreeView control, we first need to assign some data. For that purpose I have build a class called Data with a single method FetchTestData(). This method returns a string array of EU countries. From the C# code you can see that the countries are set to the ItemsSource property of the TreeView. Usually that is enough, but I also coded an extension method called Convert. This method is responsible for creating a TreeViewItem control that will host the text.
I am creating a TreeViewItem control for each string so that I can have a way to control the height of each TreeView item. We will see how that plays into our application a little later. Right now, let’s see how to implement the Convert method extension.
Convert extension method in C# implementation
internal static IEnumerable<TreeViewItem> Convert(this IEnumerable<string> items)
{
    foreach (var item in items)
        yield return new TreeViewItem() { Header = item };
}
This C# code is quite simple. For each string coming our way, create a new TreeViewItem control and set its header to the input string. The result of this method will be returned to the TreeView control ItemsSource property. As a result, instead of presenting strings only, the TreeView control will present a list of TreeViewItem controls, who in turn will display the input string.
Filter TreeView control via TextBox
In this part of the tutorial we will look at the filtering implementation.
private void txtSearch_TextChanged(object sender, TextChangedEventArgs e) =>
treeView.Items.FilterBy(predicate);

private bool predicate(TreeViewItem item) =>
item.GetHeaderOrEmpty().StartsWith(txtSearch.Text, StringComparison.OrdinalIgnoreCase);
In this section we have an event handler and a method (predicate).
- txtSearch_TextChanged
- predicate
The event handler is raised whenever the user enters some text inside the txtSearch TextBox control. This event will be raised anytime a user enters a letter. Since I want to filter the TreeView in real time (as user enters the input) this is the exact C# implementation of the TextChanged event I was after.
Filter TreeView control C# code implementation
This search functionality is quite simple. Just a single line of code:
treeView.Items.FilterBy(predicate);But, don’t be fooled by its simplicity. The FilterBy method is actually an extension method on the ItemCollection class. We will see it’s implementation in the next section. Right now all we need to know about this function is that it takes a predicate.
A predicate method is a C# implementation of a function that returns a bool result. In our case, this function takes a TreeViewItem control as input. We then examine the Header property to see if the given string matches.
My application should filter the list by comparing the string that it starts with. So, we use the StartsWith method. Or in other words, if the string of a given TreeViewItem control starts with the string provided by the txtSearch TextBox then return true. Otherwise, return false.
We use this predicate to search/filter the TreeView control. Here you can write your own. Maybe instead of matching only the strings that starts with a certain text, you might want to see if a string contains the text provided by the user. Or any other search/filter scenario for that matter.
Filter/Search implementation
Now, let’s get back to the following line:
treeView.Items.FilterBy(predicate);Like I said before, the FilterBy method is not provided by the .NET framework. It is an extension method. So, let’s dig deep and see what lays behind this C# statement.
internal static void FilterBy(this ItemCollection collection, Func<TreeViewItem, bool> filter)
{
    collection.Do<TreeViewItem>(item => item.Collapse());
    collection.Where<TreeViewItem>(filter).Do(item => item.Expand());
}
This extension method does exactly what we want. First it collapses all the TreeViewItem controls inside the TreeView. Then it executes a Where method and each element that satisfies the predicate condition gets expanded.
I will mention it again. The ItemCollection class does not have the implementation for the Do and Where methods. In the next section we will see how to create these extension functions in C# as well.
C# Extension Methods
internal static void Do<T>(this ItemCollection collection, Action<T> onItem) where T : class
{
    foreach (var item in collection)
    {
        if (item is T castItem)
            onItem(castItem);
    }
}
Here we can see the C# implementation of the Do extension function. It’s actually quite self descriptive. For each element in the collection execute the onItem action. I like creating these extension methods because they are helping me to keep the calling code, quite clear and simple.
Now, let’s move on the the Where method:
internal static IEnumerable<T> Where<T>(this ItemCollection collection, Func<T, bool> predicate) where T : class
{
    foreach (var item in collection)
    {
        if (item is T)
        {
            if (item is T castItem && predicate(castItem))
                yield return castItem;
        }
    }
}
No surprises there either. For each element we are checking if the predicate will return true. If it does then we yield back that element to the calling code. In our case we are returning the TreeViewItem control.
TreeViewItem Extensions
All that is left for us to implement, are the TreeViewItem extensions. We saw them in the FilterBy method. We are missing two functions:
- Collapse
- Expand
Let’s look at the Collapse C# code first:
internal static void Collapse(this TreeViewItem treeViewItem) =>
    treeViewItem.Height = 0;
Because we are working with TreeViewItem control, we should only set it’s height to 0.
For the Expand method:
internal static void Expand(this TreeViewItem treeViewItem)
{
    treeViewItem.Height = Double.NaN;
    treeViewItem.IsExpanded = true;
}
We allow it to be set to its default height value, and we make sure that the IsExpanded property is set to true.
I chose to work with TreeViewItem control because usually in the Header component we can create a more complex user control. This code will work for that scenario as well. In some of my next tutorials, there will be a more complex hierarchical situation. But we will deal with that later.
One final C# code implementation that we are missing to complete this TreeView filter project is the following method:
internal static string GetHeaderOrEmpty(this TreeViewItem treeViewItem)
{
    string? header = treeViewItem.Header as string;
    if (header == null) return string.Empty;
    return header;
}
The name of the function GetHeaderOrEmpty tells the whole story. If you remember from a while back, we assign the string to the Header class of the TreeViewItem control. So, I already know that the header is a string. This code will parse it and protect me against potential errors.
You can see the function in action inside the predicate we gave to the FilterBy method in our main window.
Conclusion
This tutorial focuses on the topic of filter TreeView control in C# using WPF. This can also work with WinForms potentially with small changes. This functionality is something that almost all applications need. A dynamic filter/search algorithm to find an item inside a TreeView. Although this is just a simple implementation, there will be one more post about hierarchical structures. We will reuse the code in a more complex scenario and it will still work as expected.
Until next time.